X509 Certificate Setup Guide
Overview
Purpose of the Article
A digital signing certificate (X.509) is an essential tool for remote online notarizations (RON). When you apply your digital certificate to a document, it embeds your validated notary credentials into the document's code, creates a tamper-evident seal that becomes invalid if the document is altered, and provides cryptographic evidence that you personally notarized the document. The certificate isn't visible on the face of the document but works behind the scenes to ensure authenticity and integrity. This guide will walk you through the process of obtaining, setting up, and using your digital certificate with Notary Hub.
Notary Hub partners with SSL.com to provide cloud-based digital signing certificates for remote online notarizations. These certificates are required by states that allow RON and provide a cryptographically secure way to digitally seal notarized documents.
Who Should Use This Guide
This guide is intended for notaries who need to purchase, verify, and integrate an X.509 digital certificate with Notary Hub for secure document signing.
Key Takeaways
- Understanding the role of X.509 certificates in remote online notarization
- How to purchase and set up your certificate
- Completing identity verification and authentication
- Troubleshooting common issues
Prerequisites
What You Need Before Starting
- A Notary Hub account
- A valid email address
- A smartphone or tablet with a camera
- An authenticator app installed
- A government-issued ID for identity verification
Step-by-Step Instructions
Start the Certificate Setup Process
| Instructions | Visuals |
|---|---|
| Log in to your Notary Hub account. |  |
| The option of setting up your X.509 certificate becomes available after you have completed your profile. Navigate to the "Onboarding" tab to complete your profile if you have not already done so. See “Onboarding Instructions” for more information. | 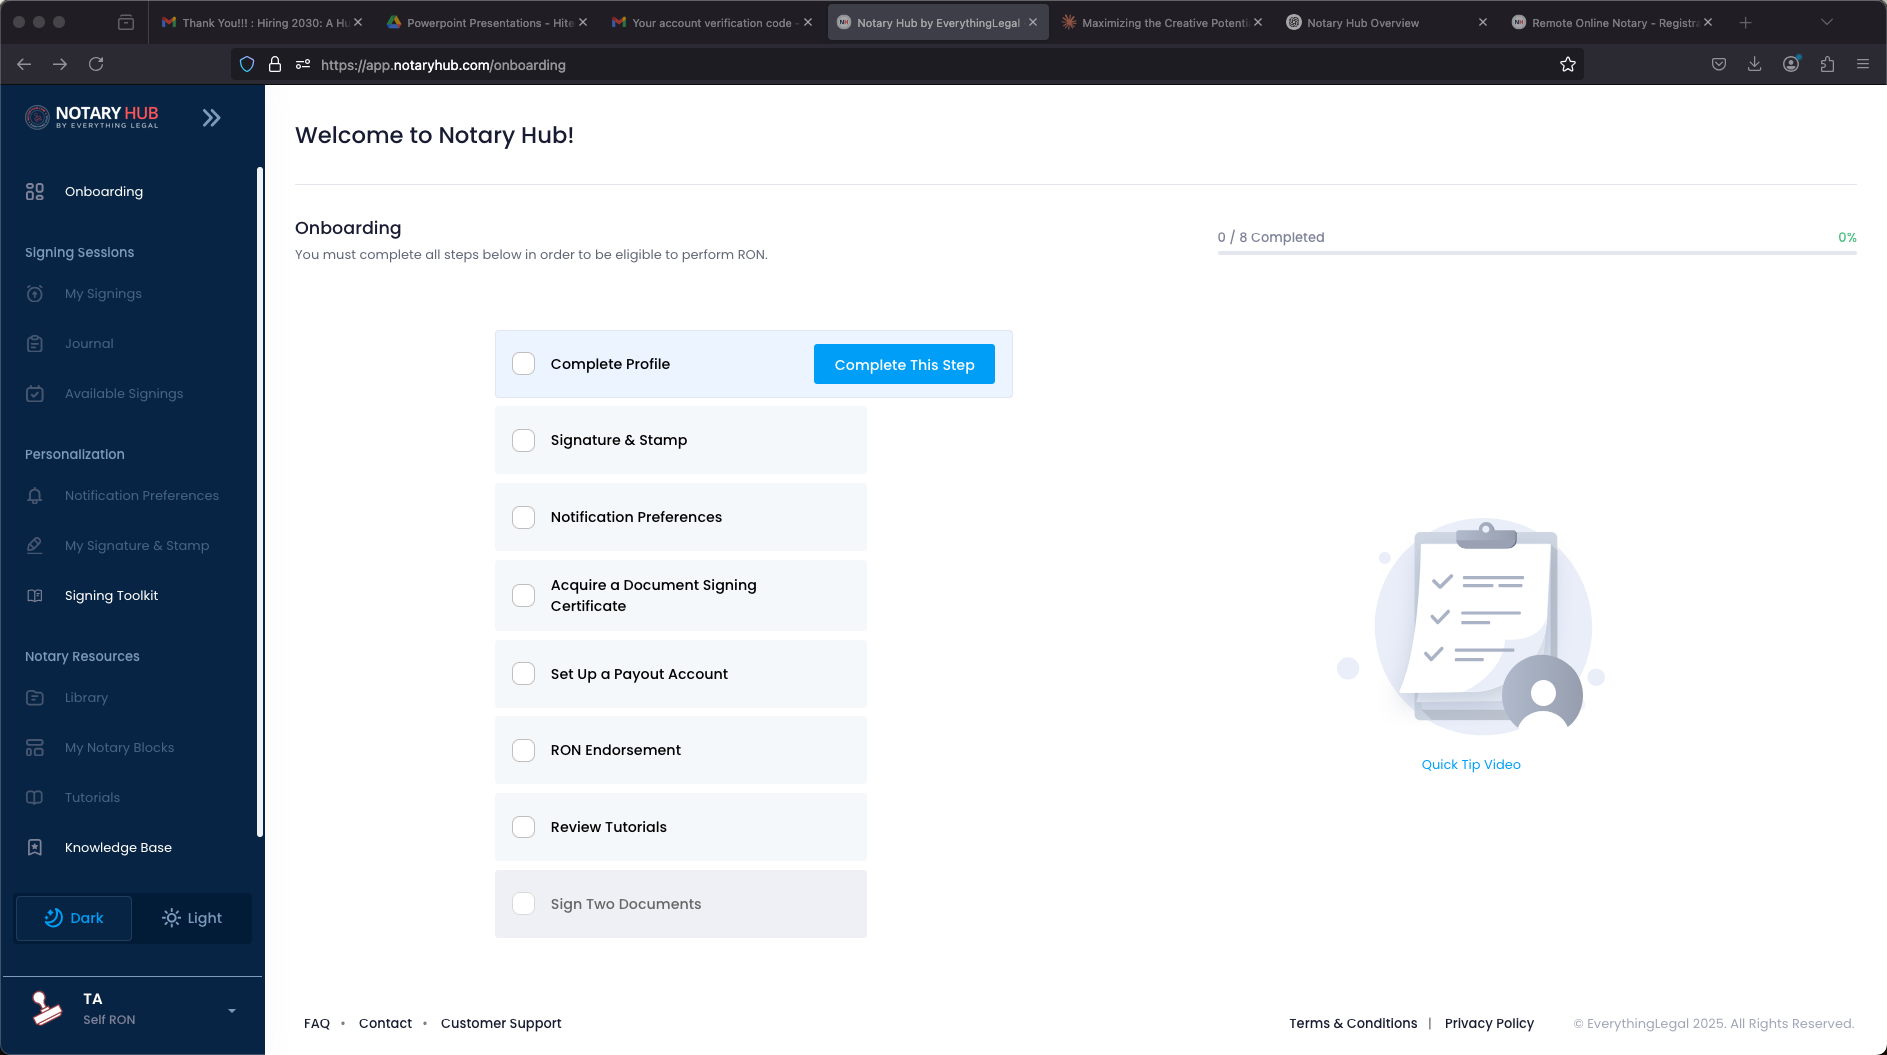 |
| After you have completed your profile, click on "My Signature & Stamp" tab on the left navigation panel. | 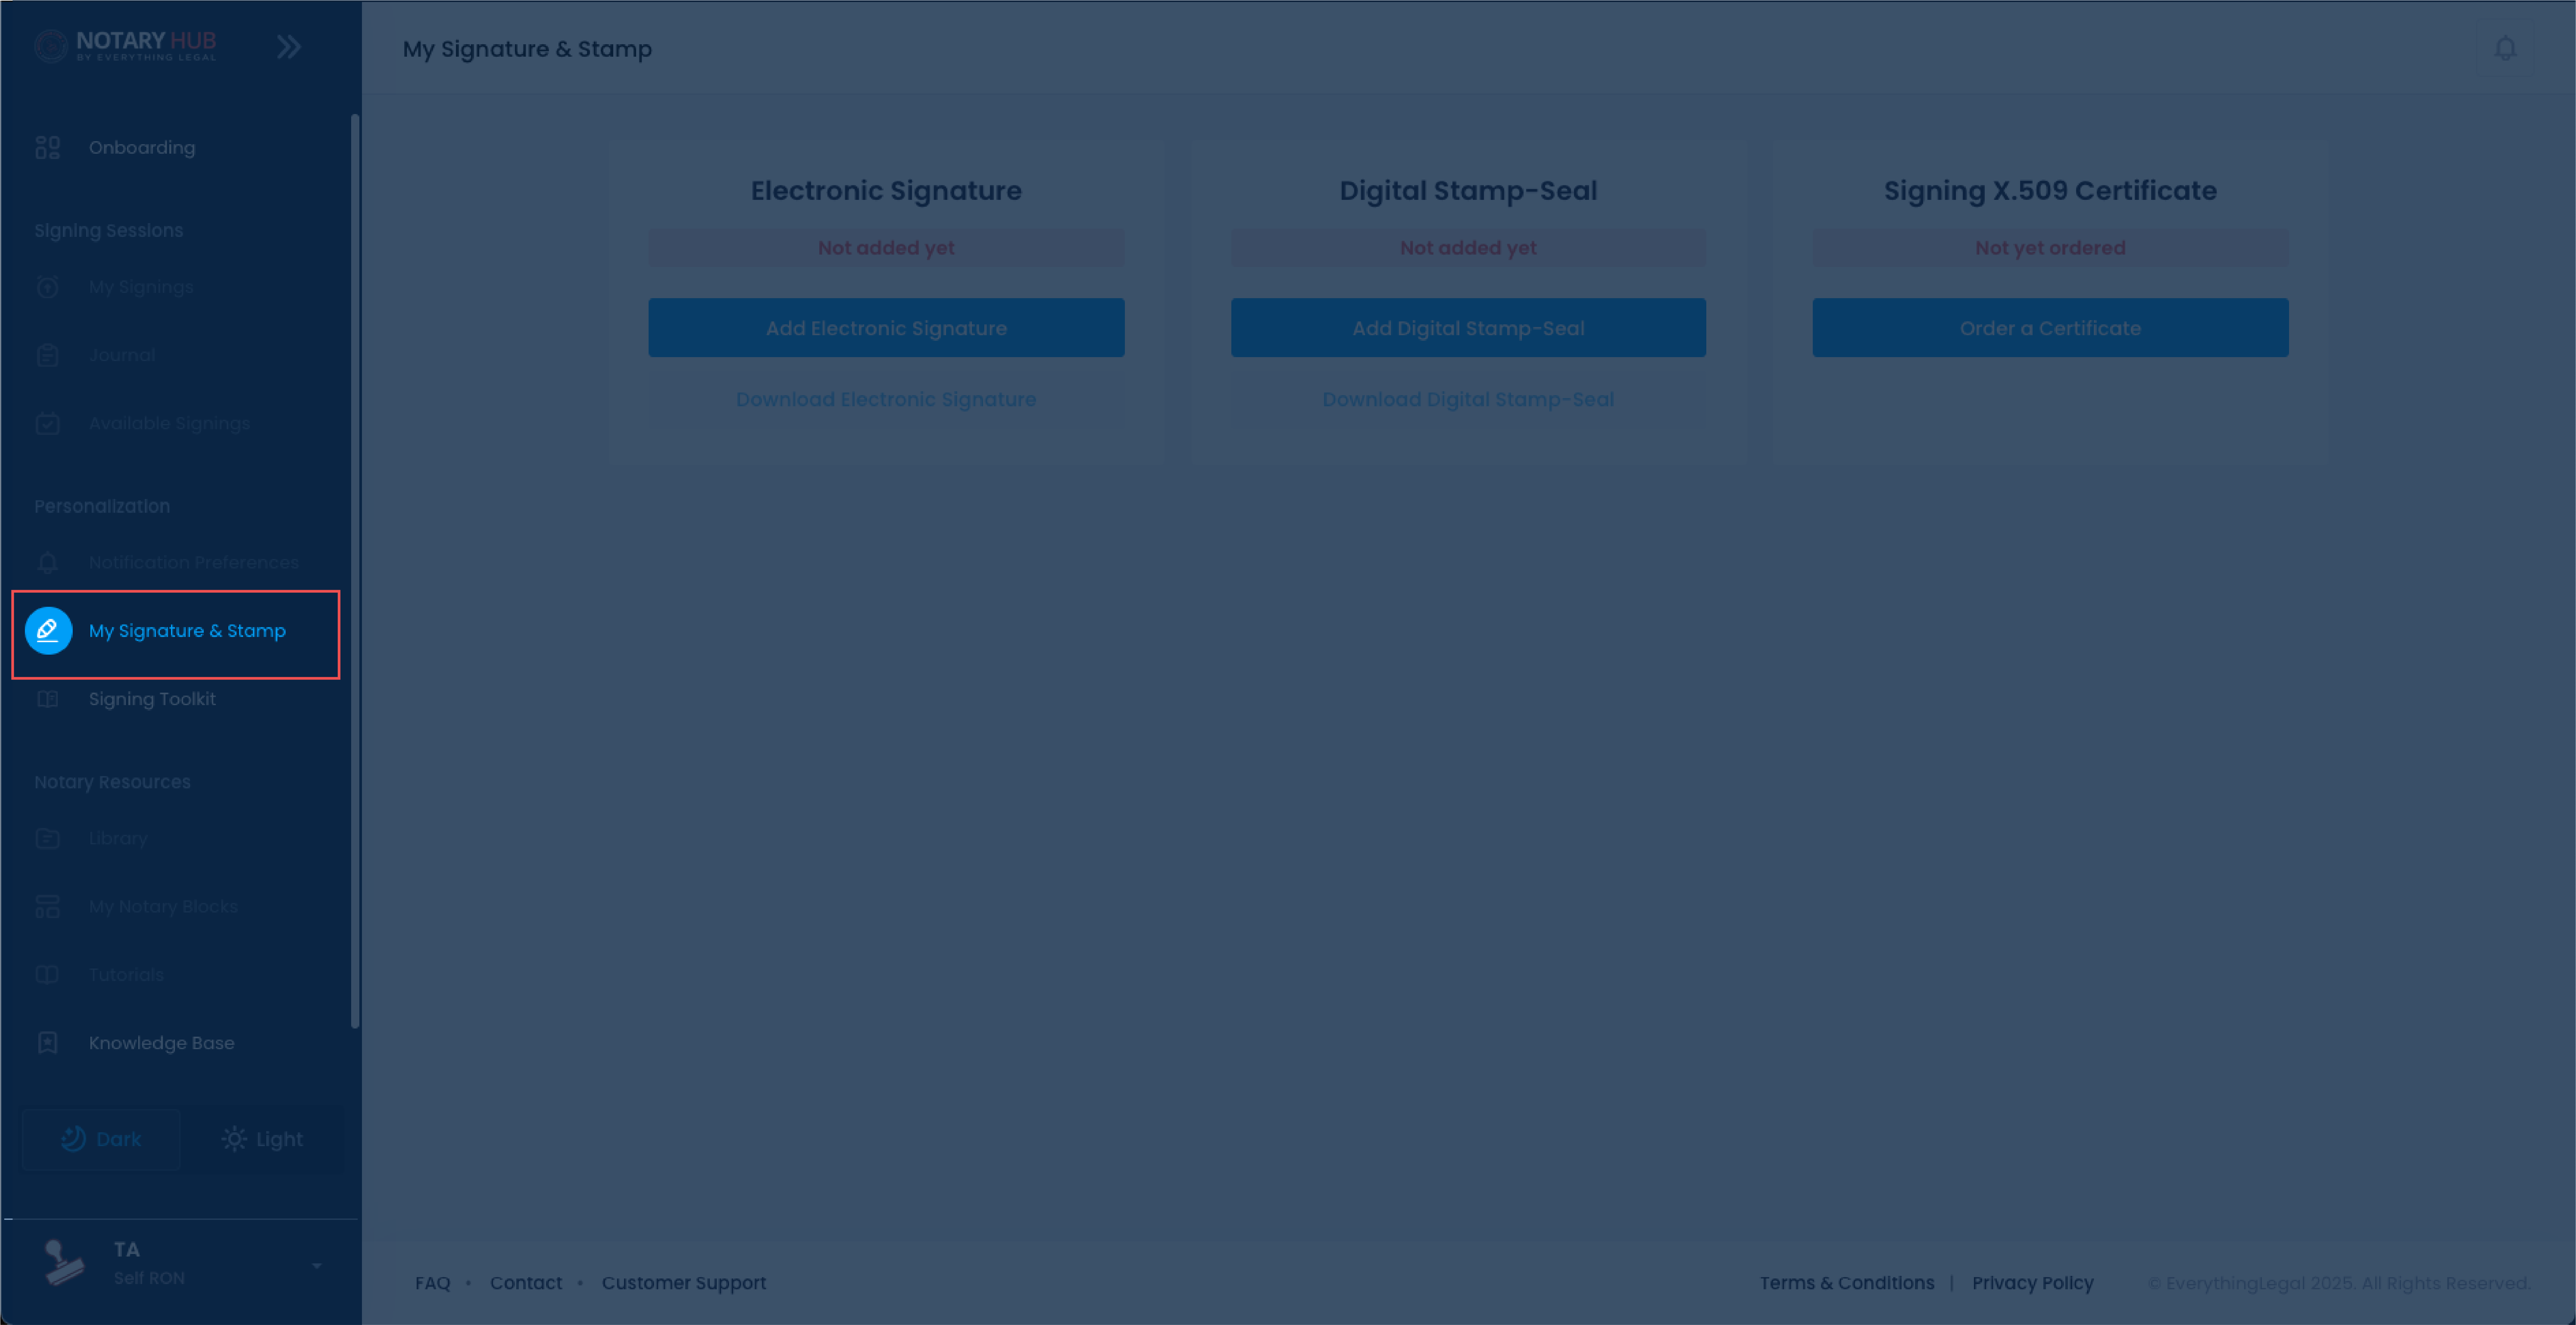 |
| Make sure you have added your electronic signature and digital stamp-seal. | 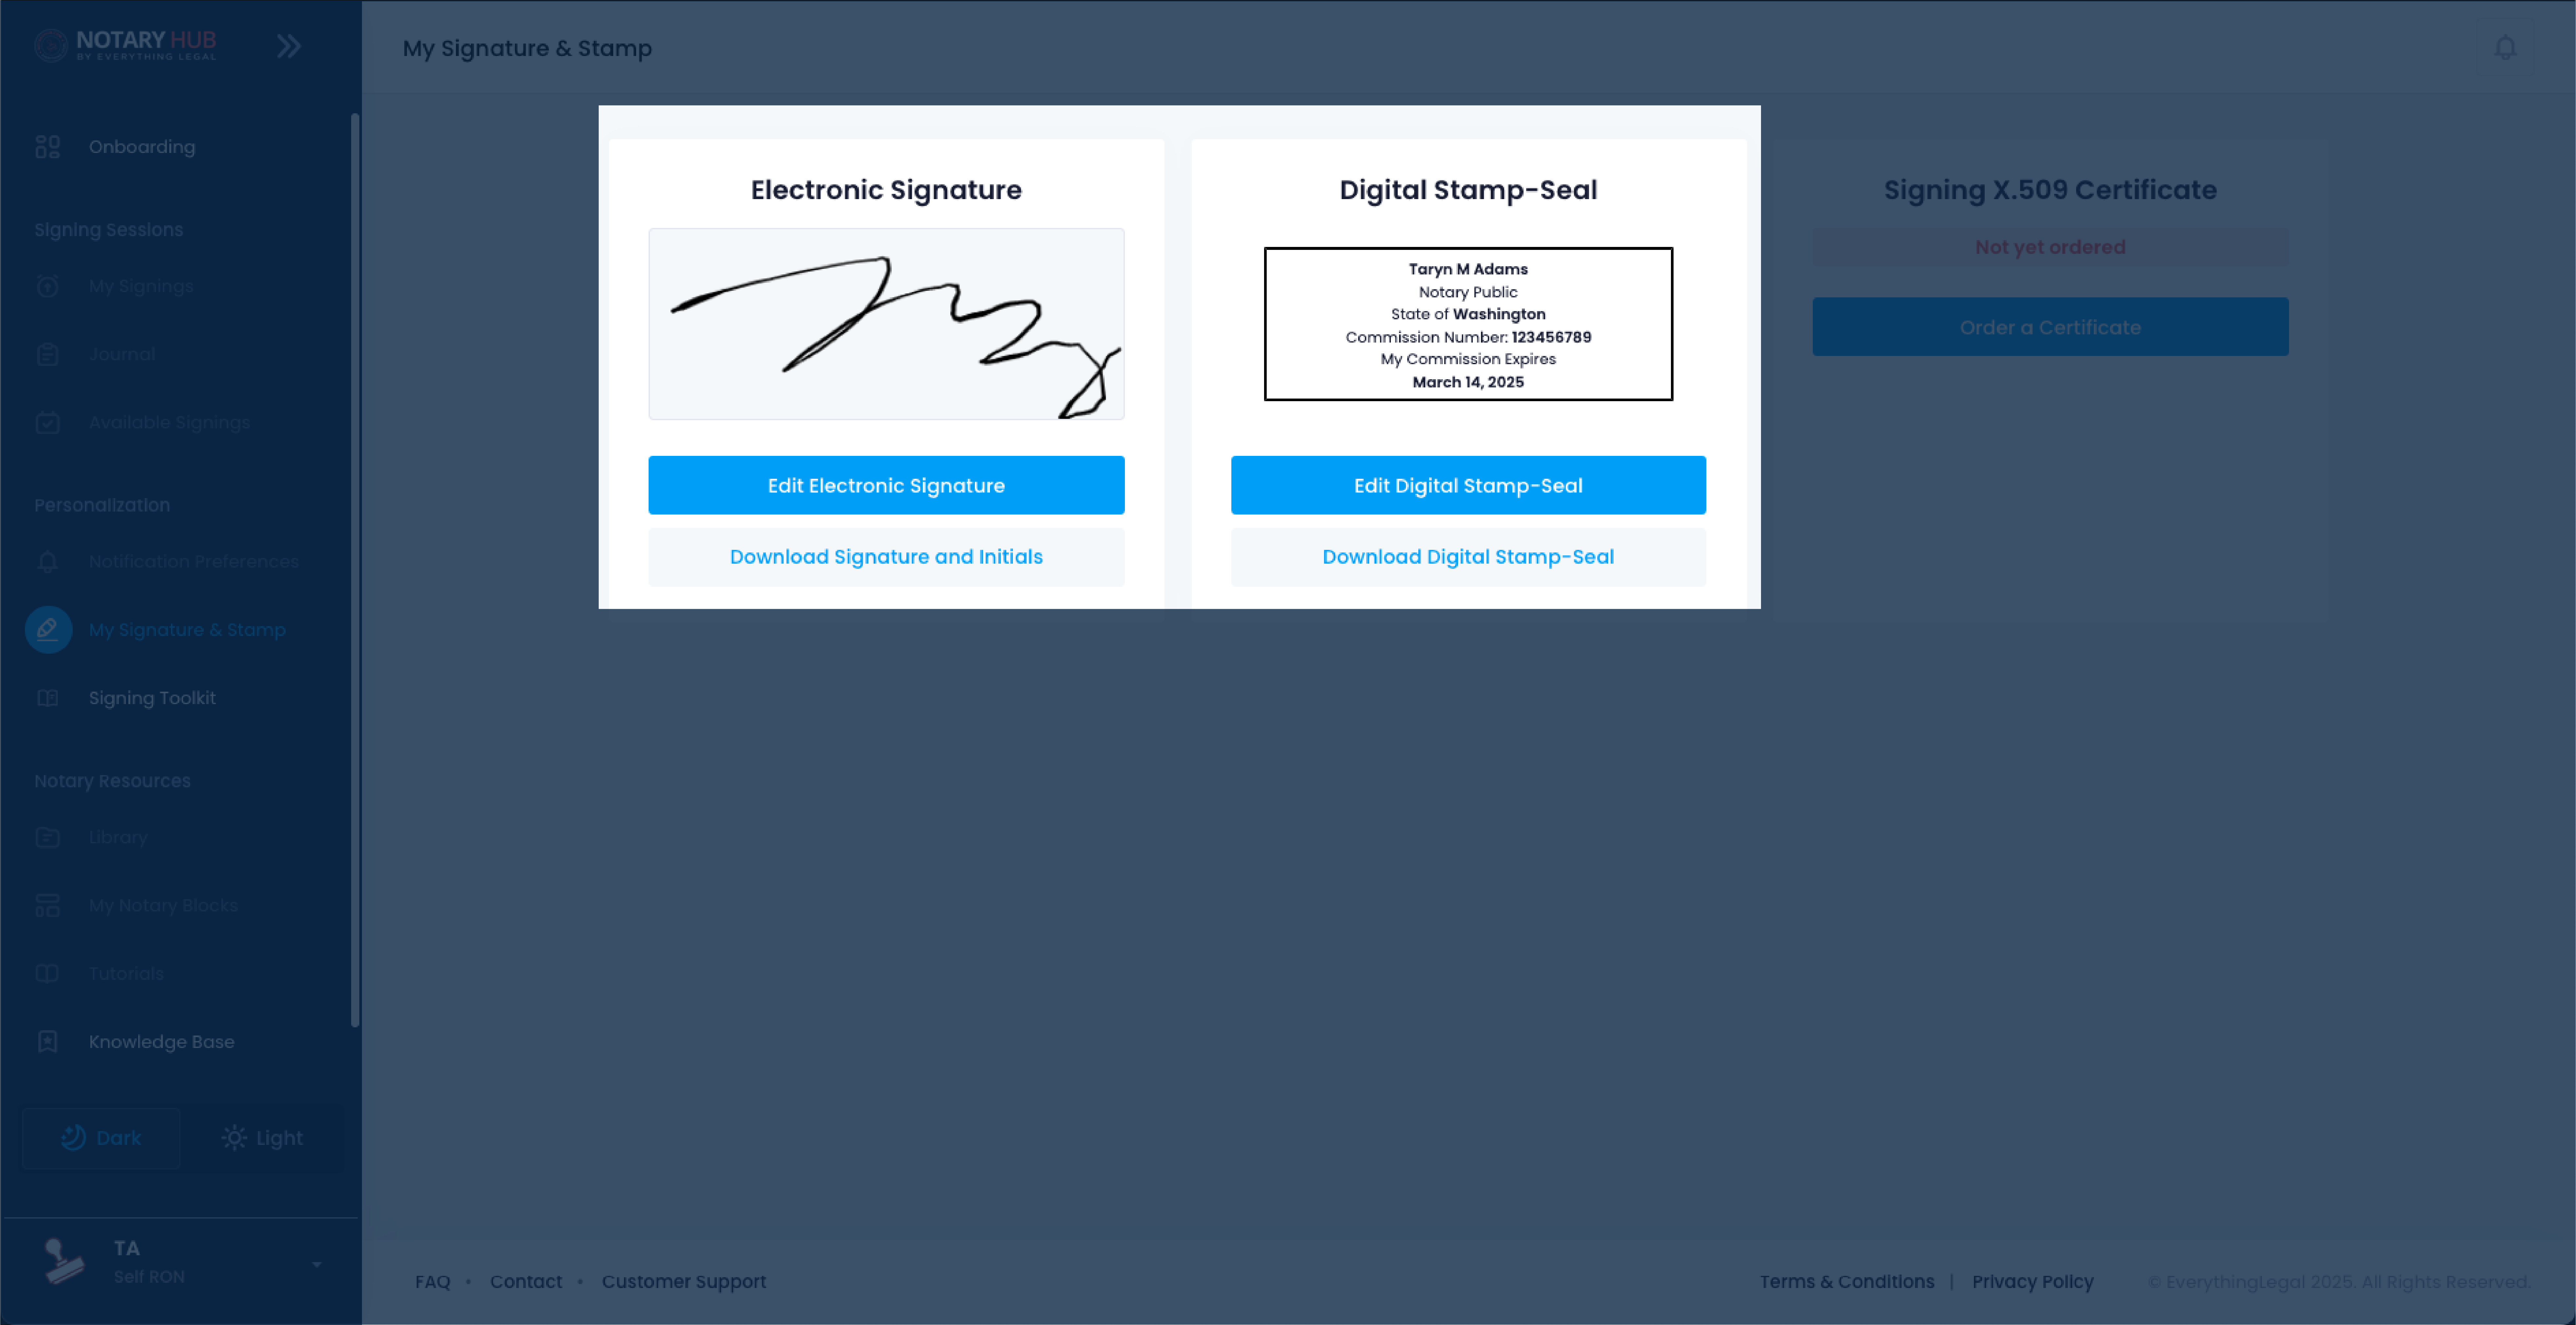 |
| Click the blue "Order a Certificate" button under "Signing x.509 Certificate." | 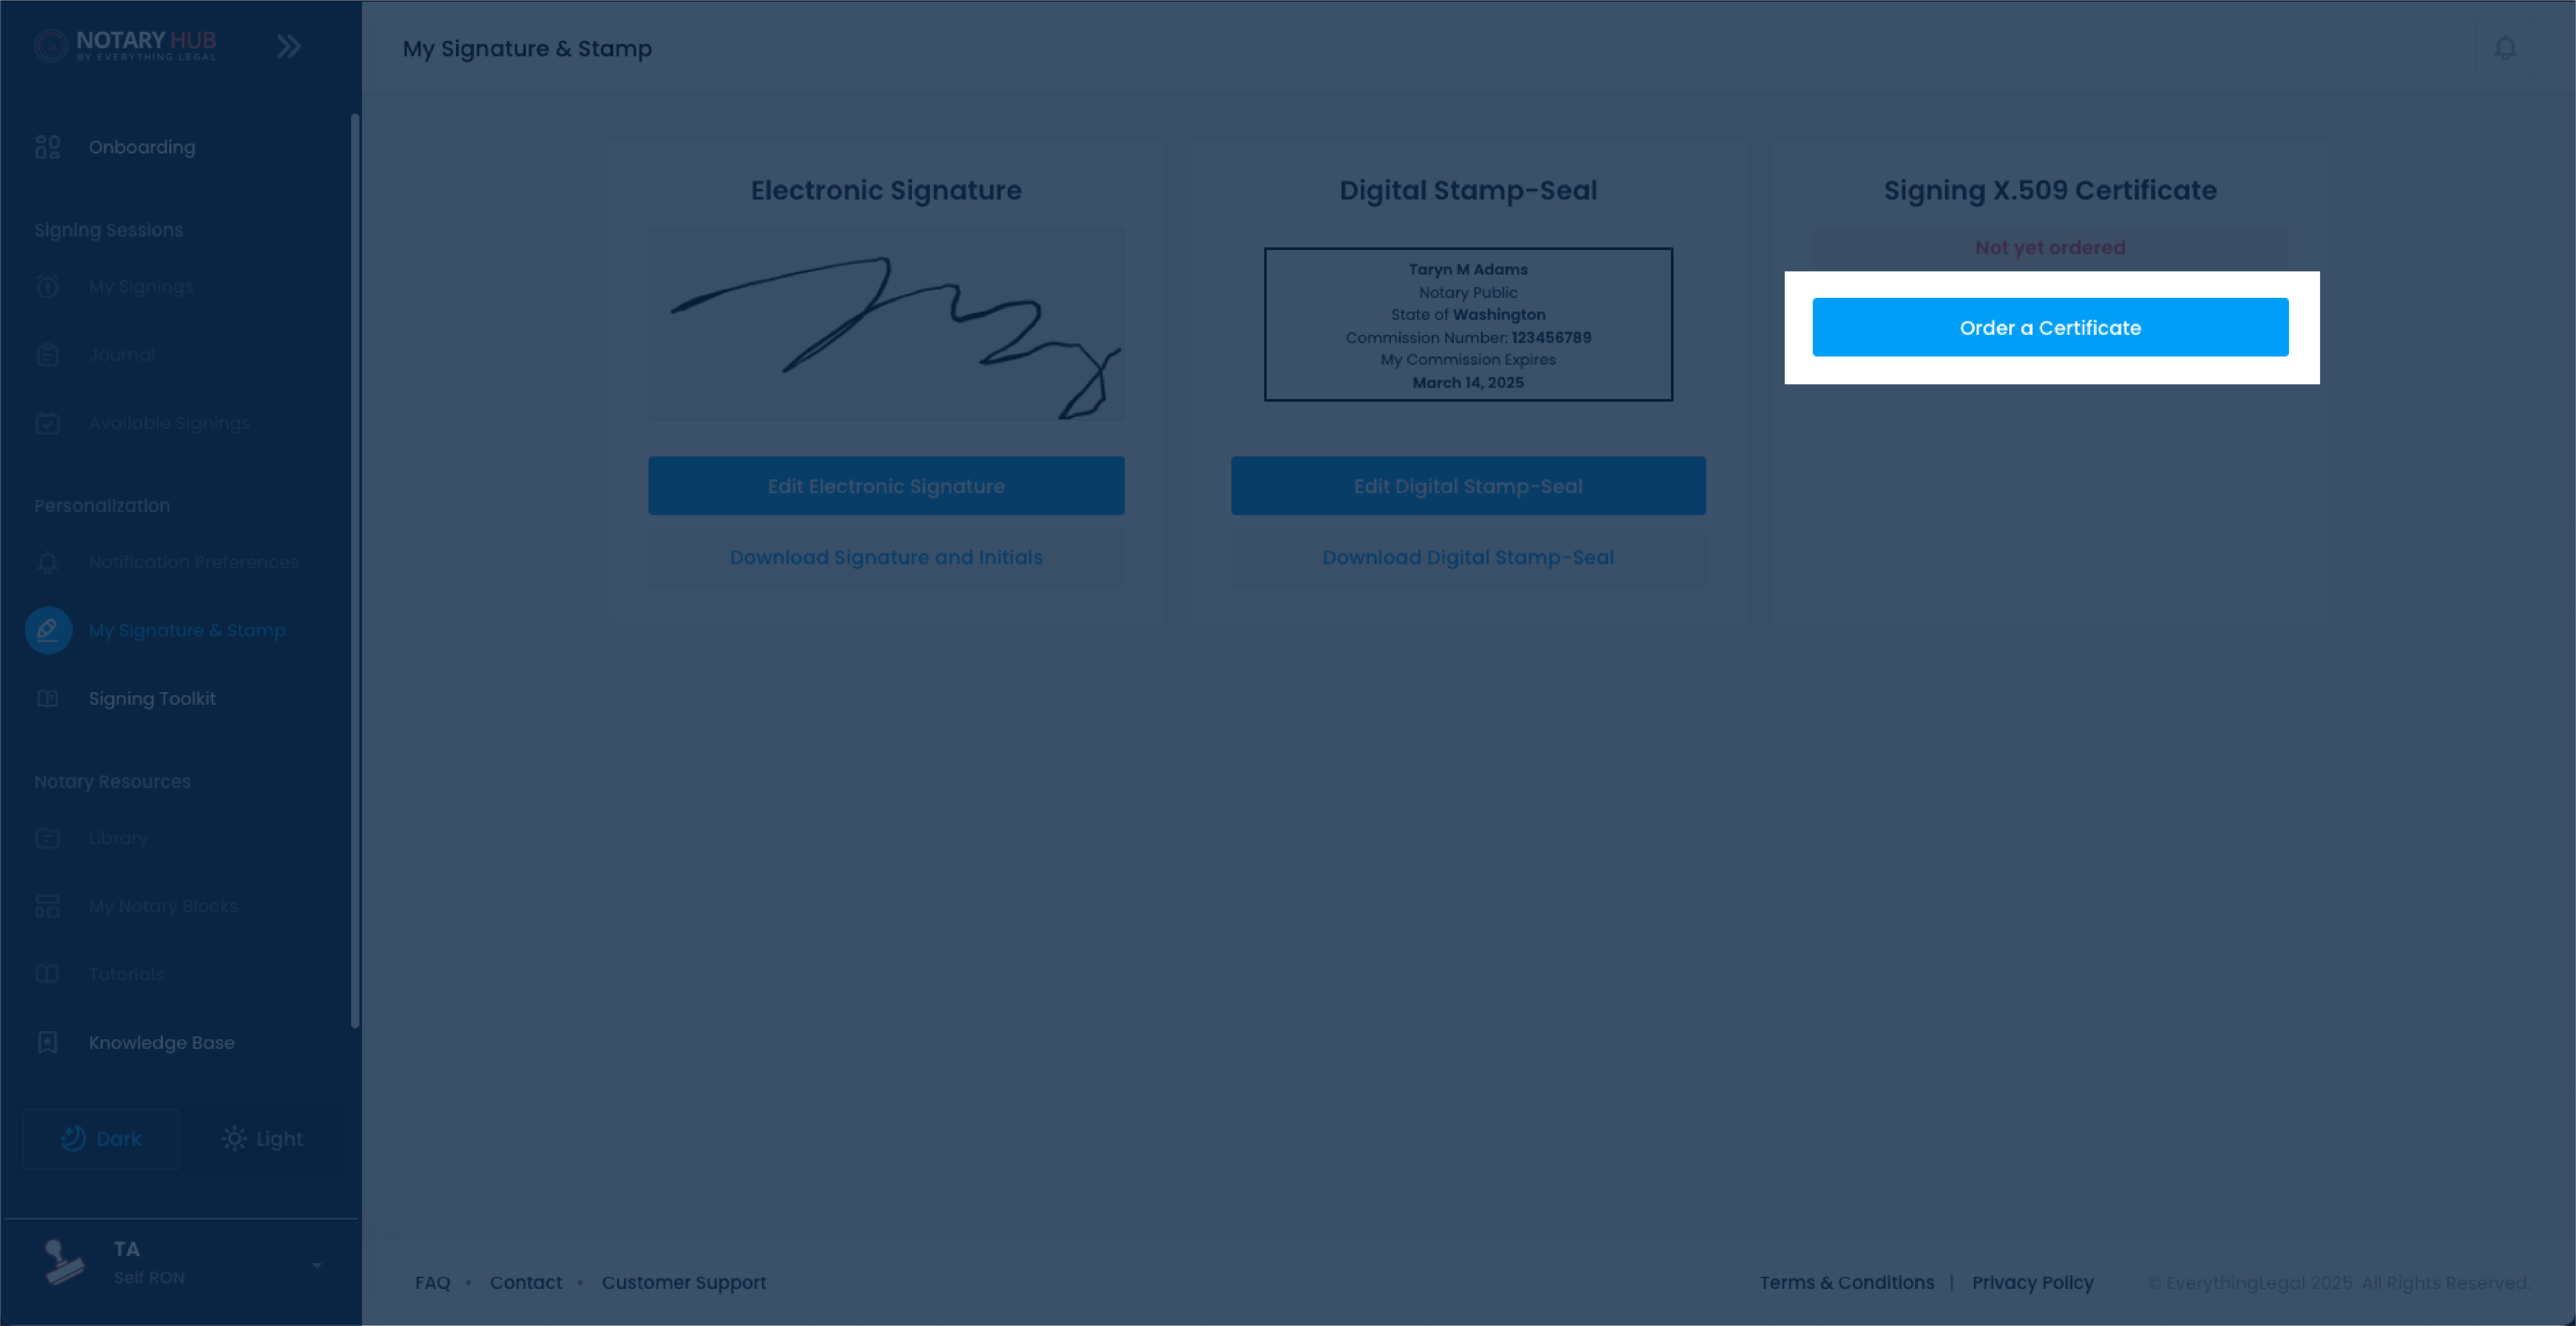 |
Create Your SSL.com Account
| Instructions | Visuals |
|---|---|
| You'll be directed to SSL.com’s registration page and your Notary Hub email will be pre-populated. | 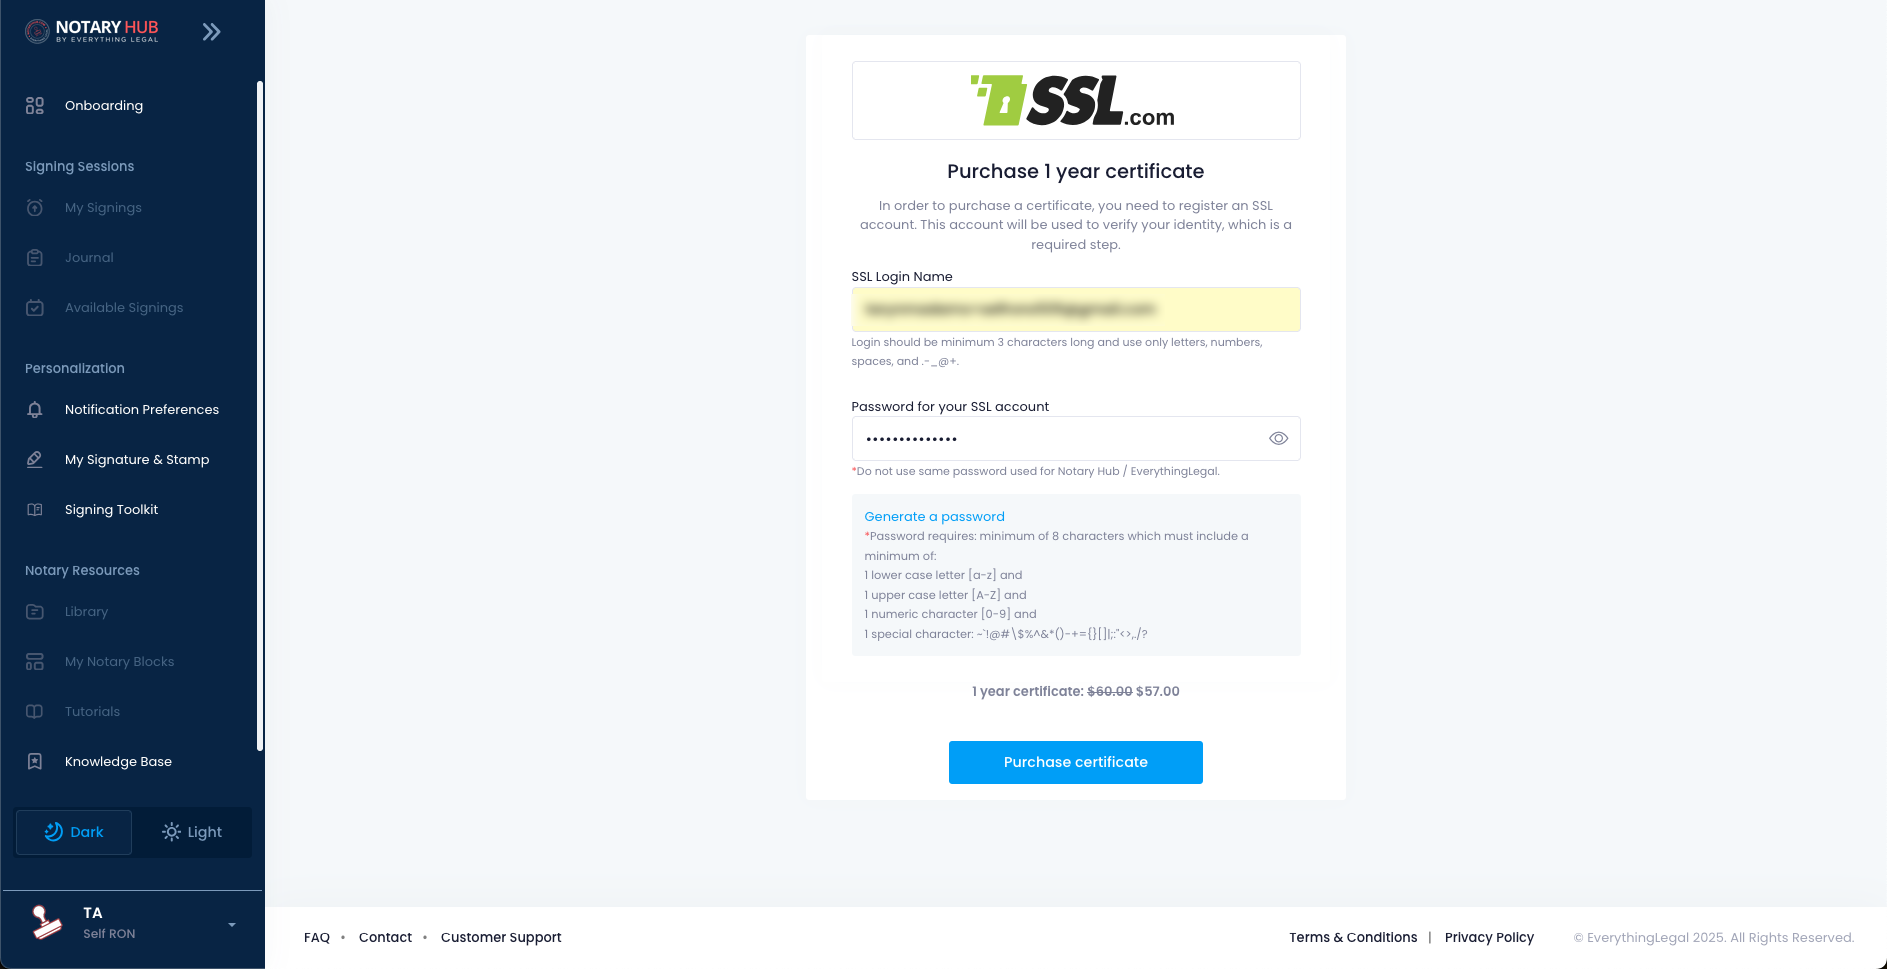 |
| Create a unique password for SSL.com and save this password for future use. | 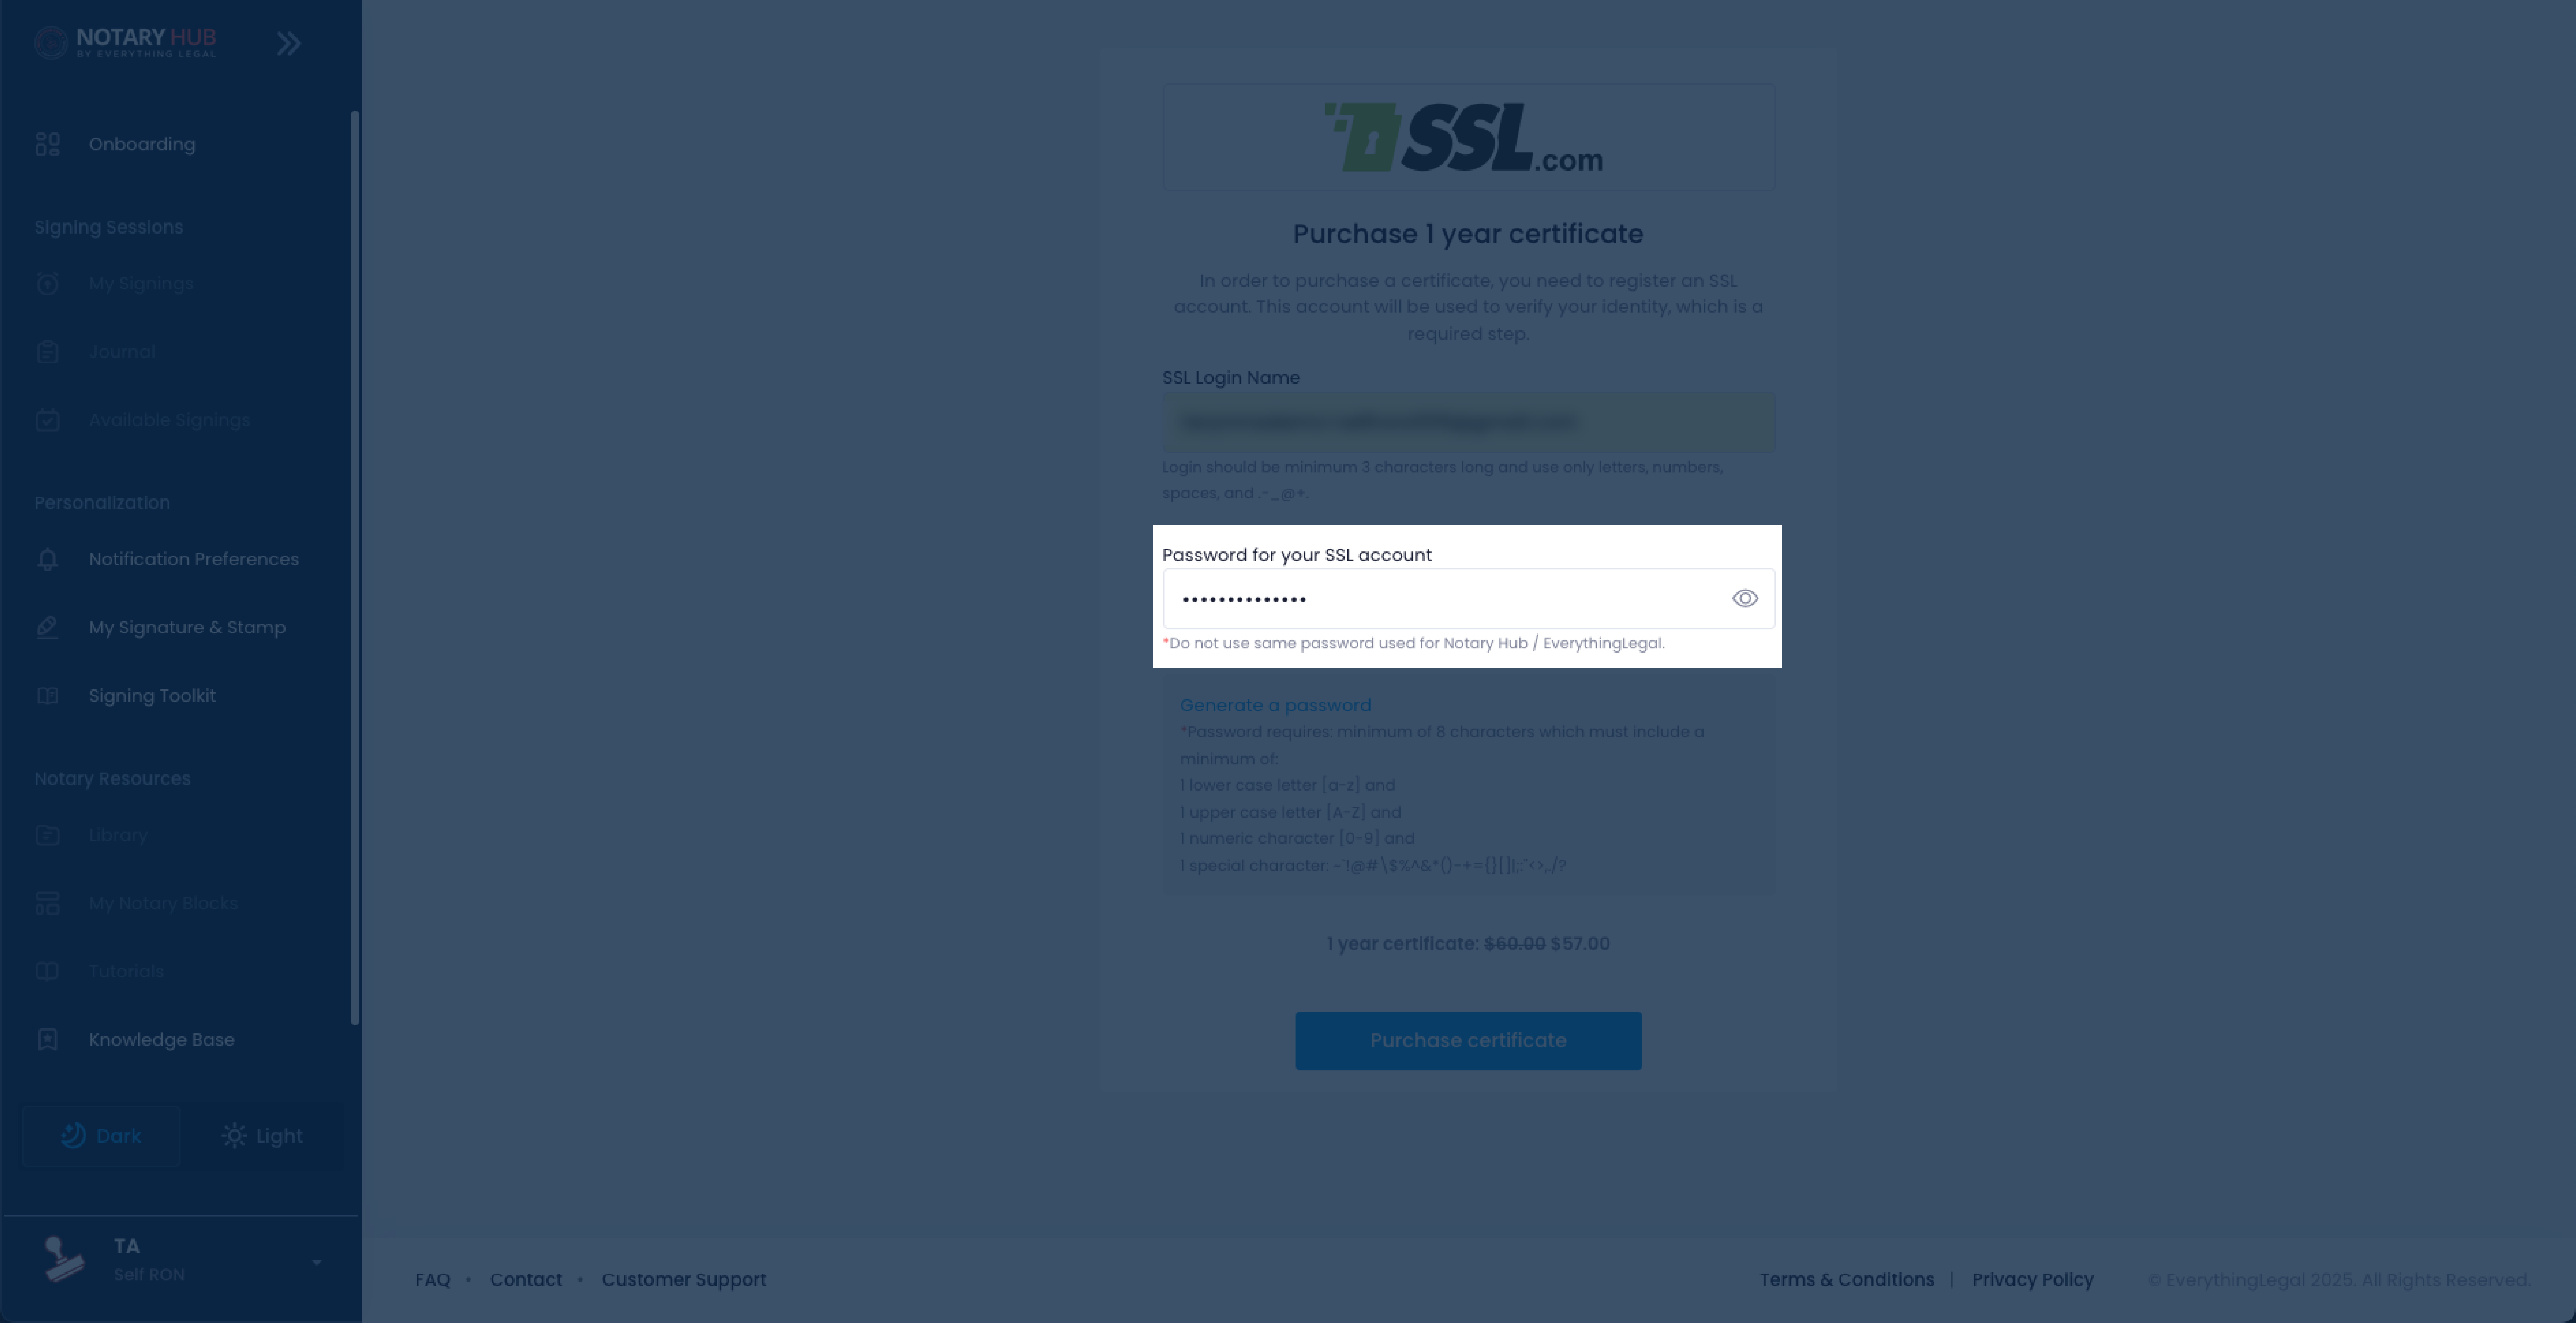 |
| Click "Purchase Certificate" to complete the transaction. | 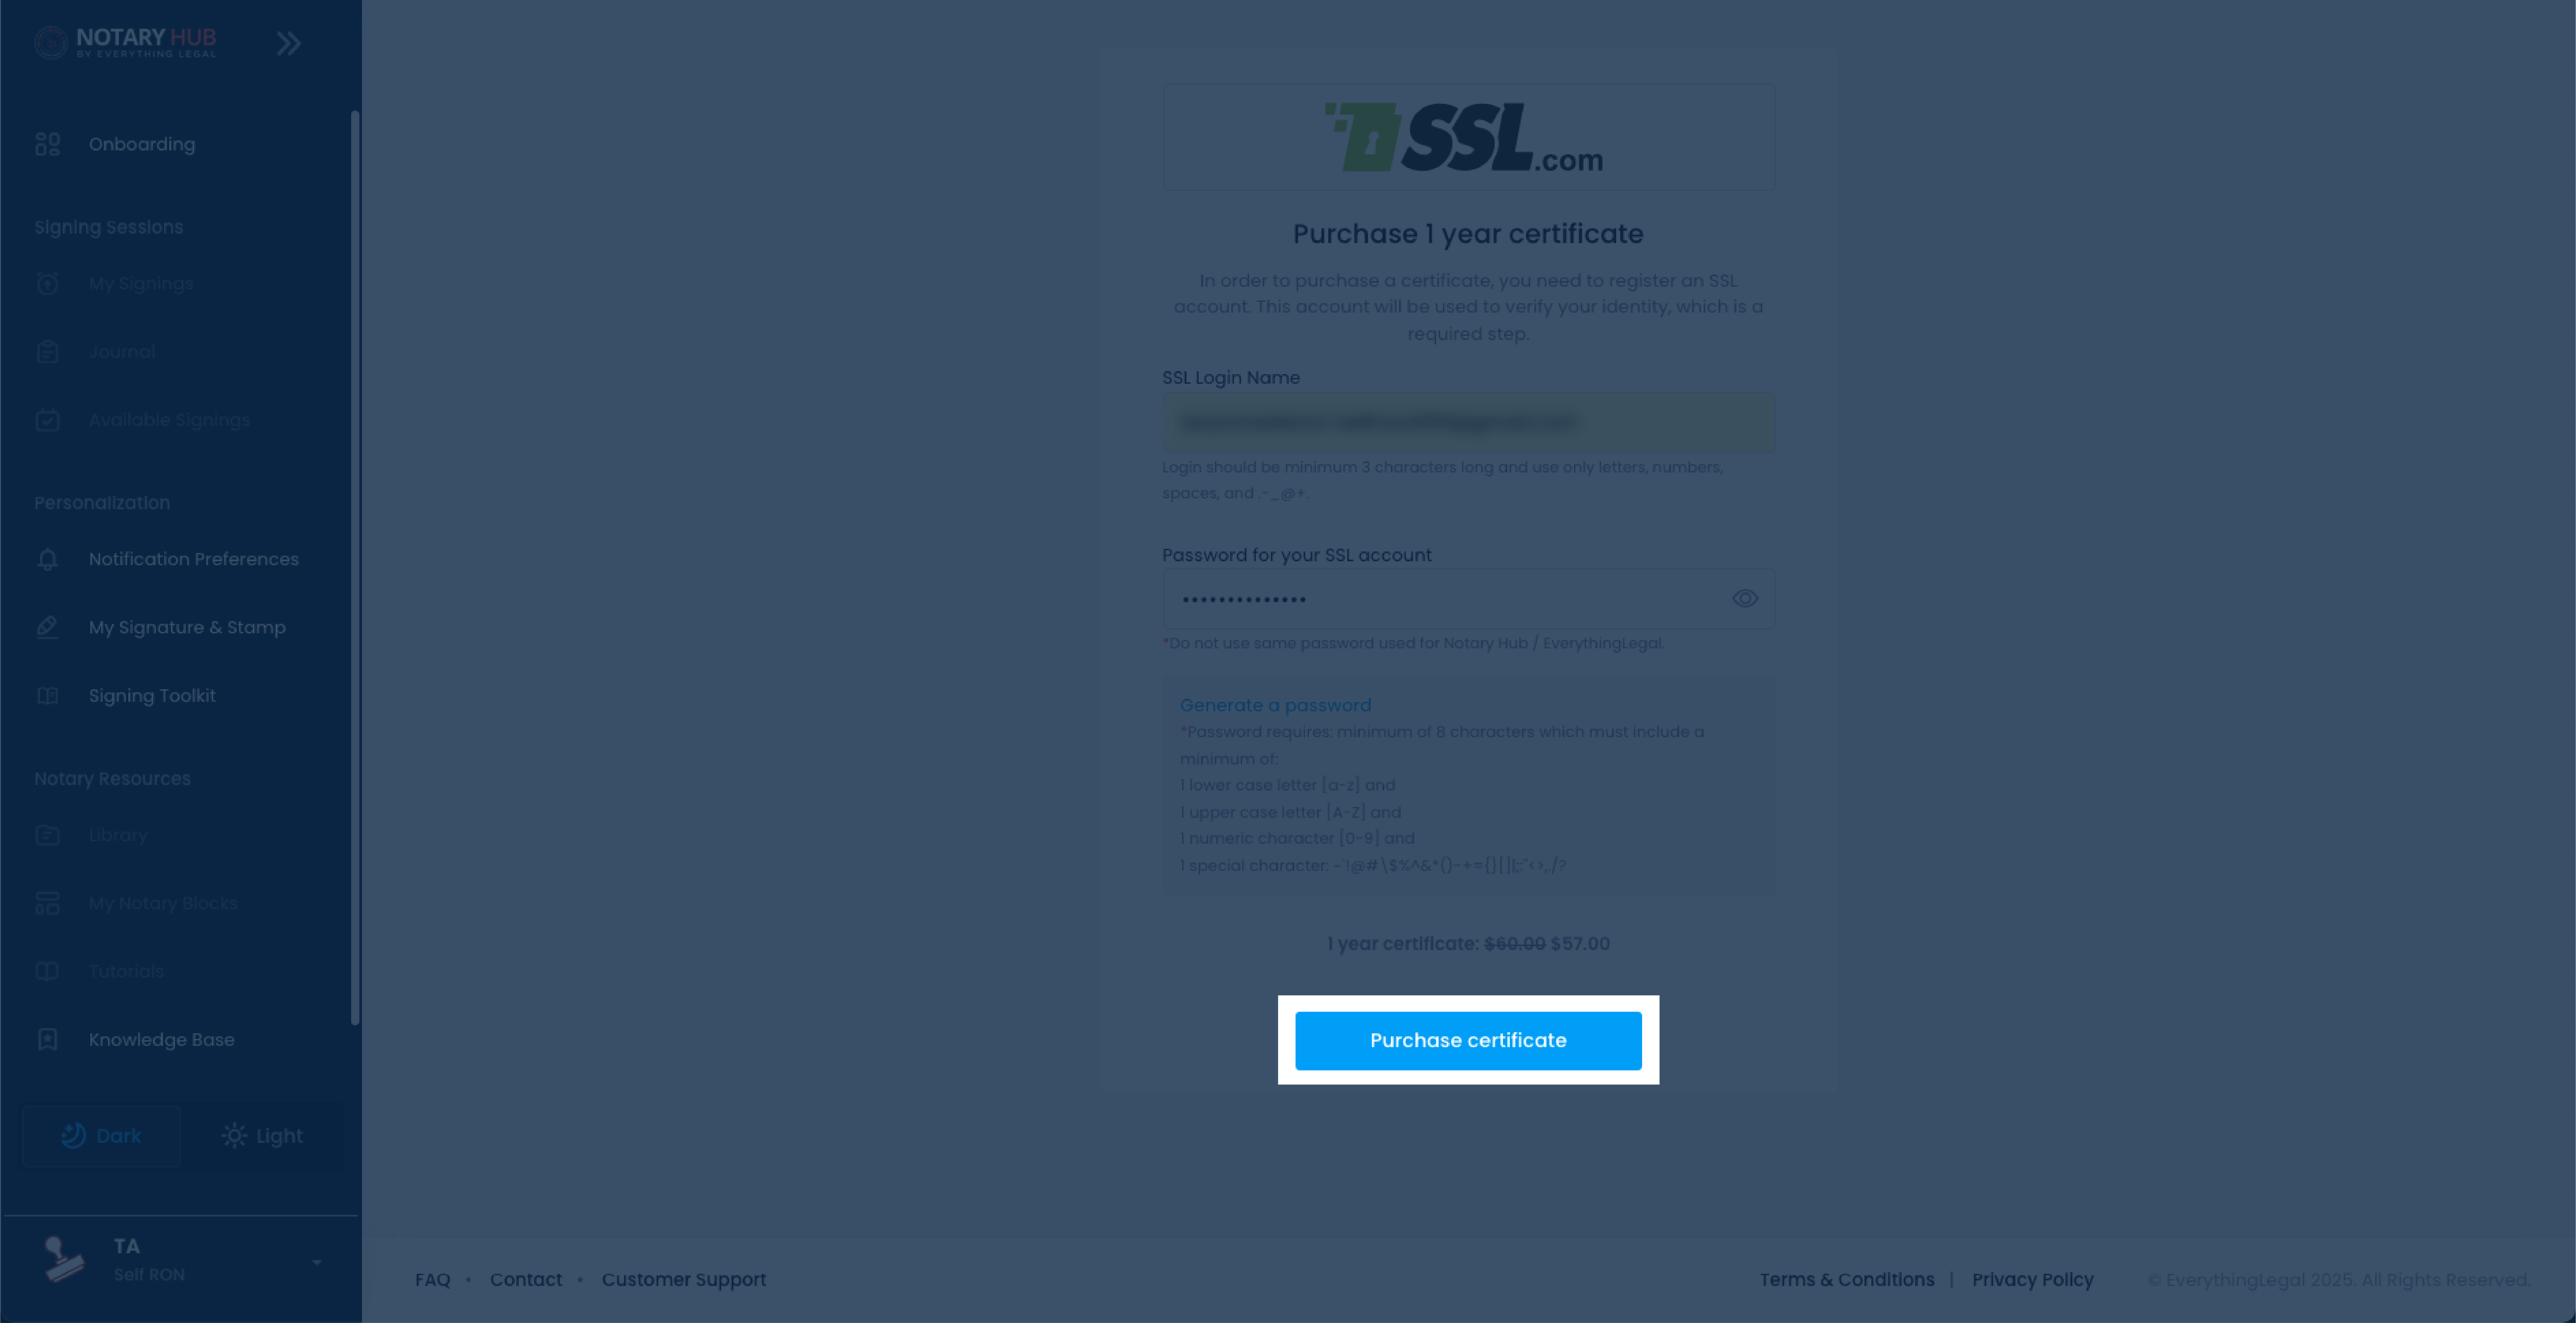 |
Return to Notary Hub
After purchase:
| Instructions | Visuals |
|---|---|
| You'll be automatically redirected to your Notary Hub Onboarding dashboard to validate your identity. Click on the blue "Validate your Identity" button under "Acquire a Document Signing Certificate." | 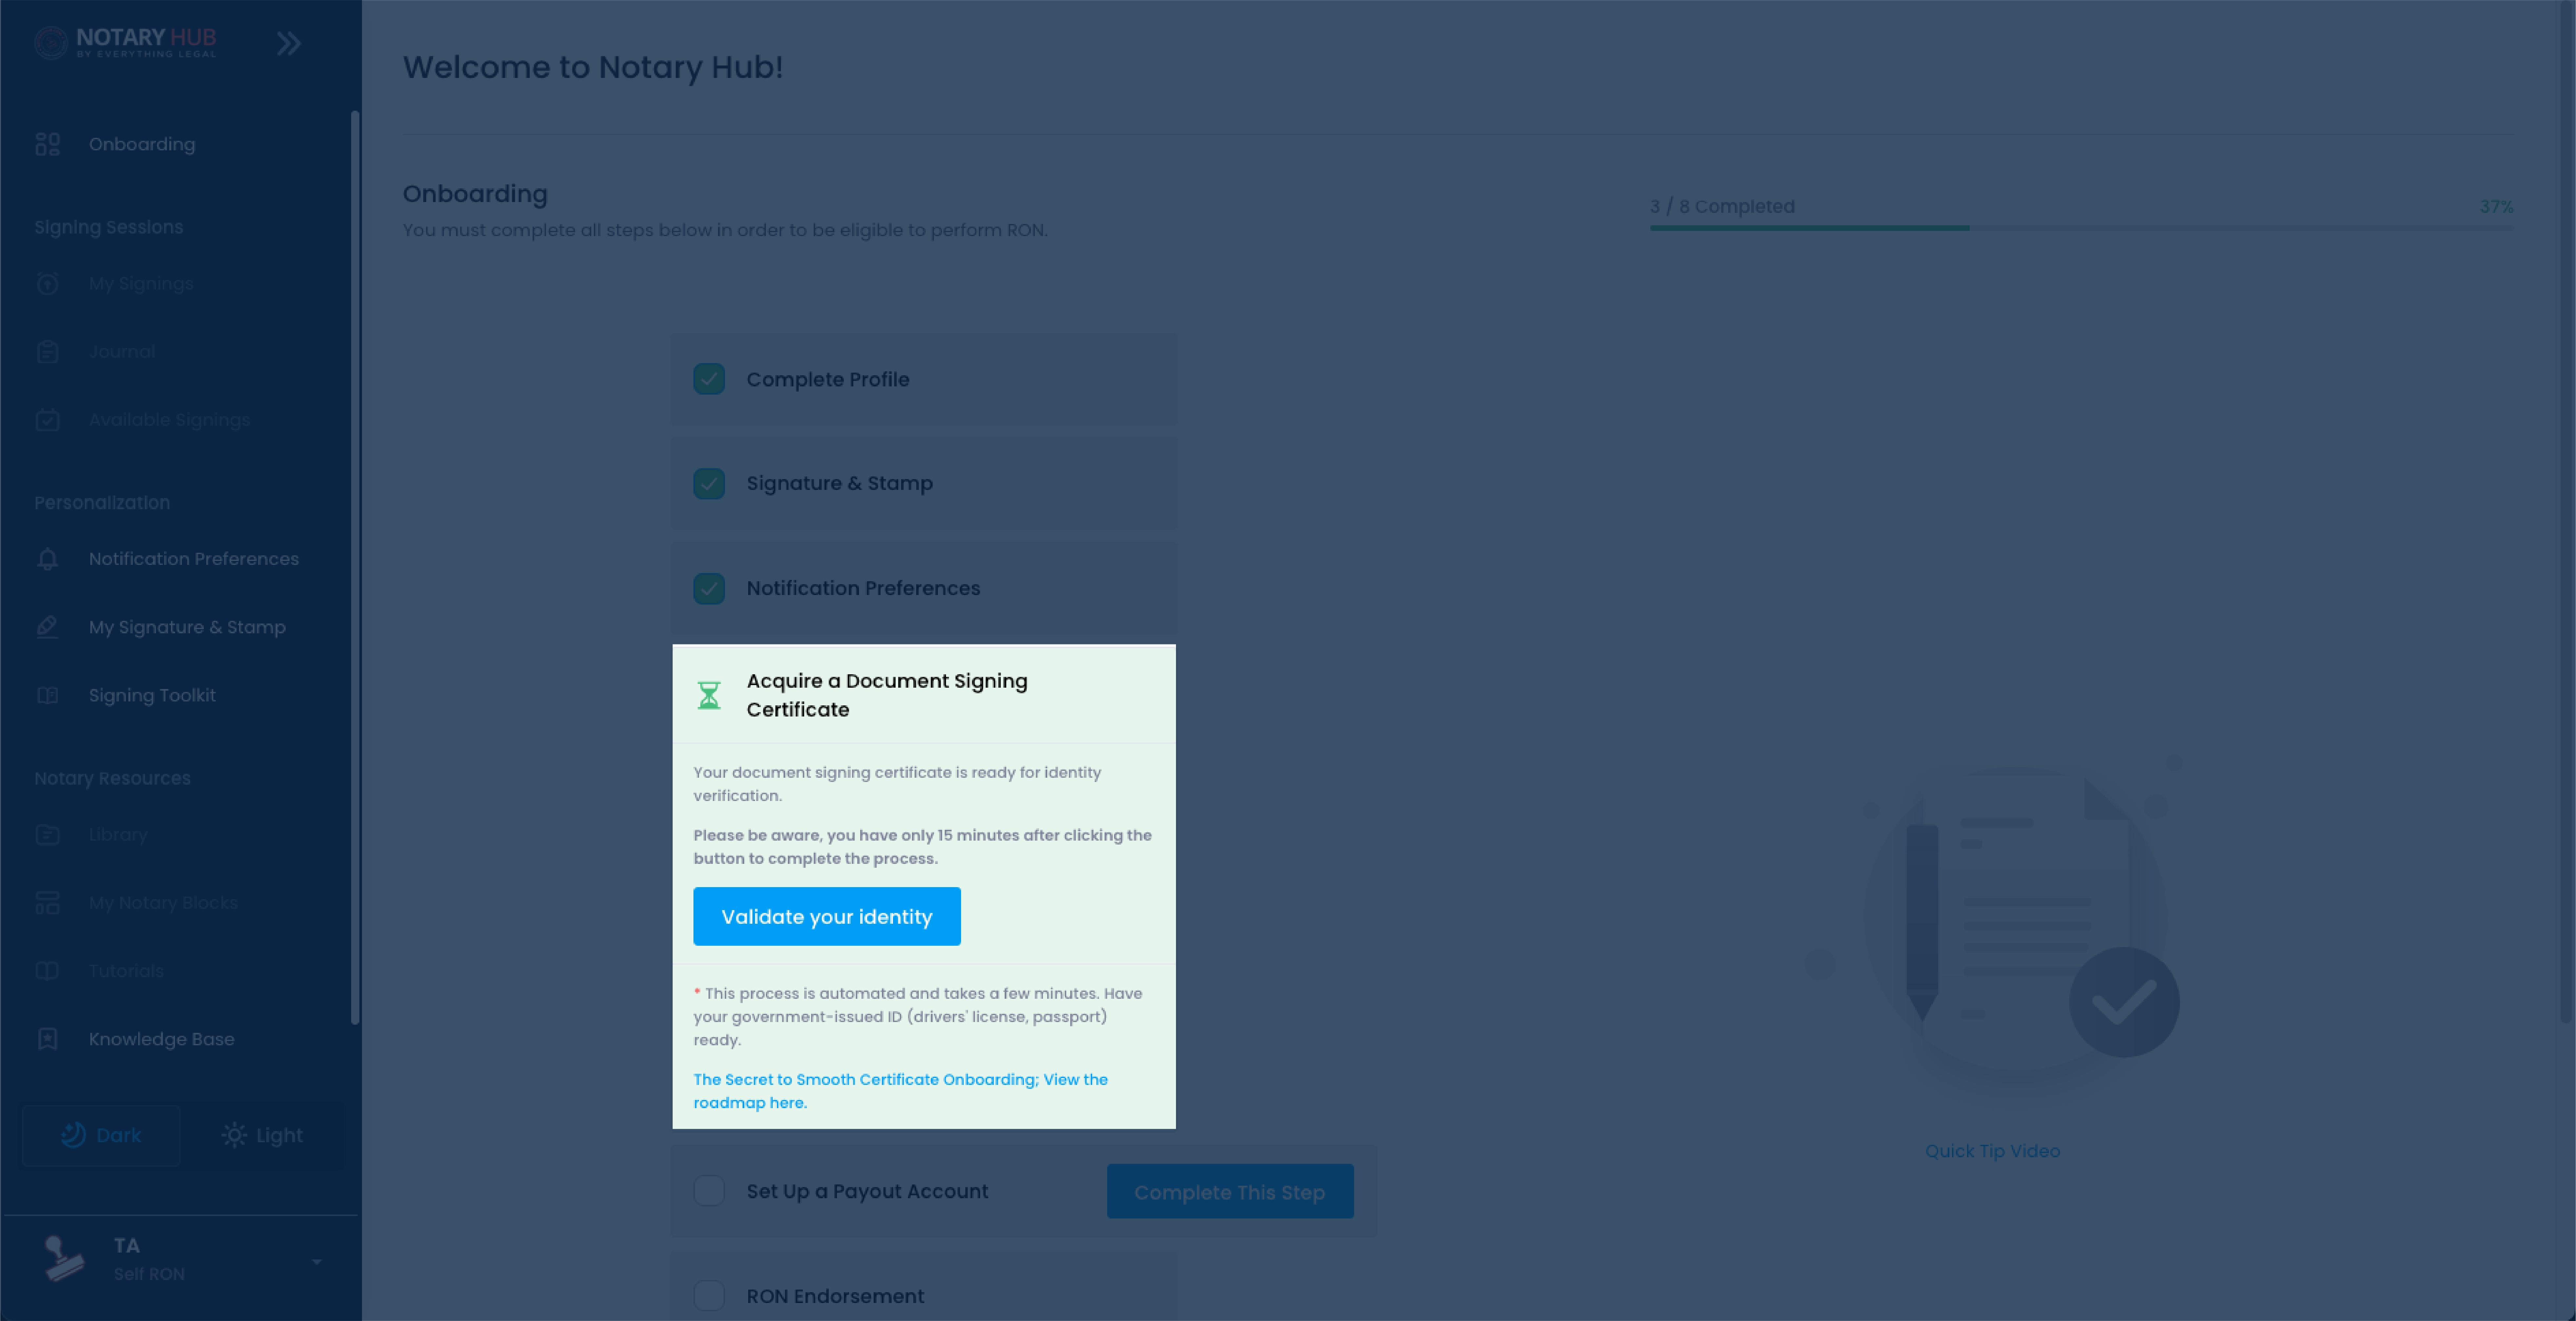 |
| A pop-up will appear with identity verification instructions. When you are ready, click on "Proceed to Identity Verification." | 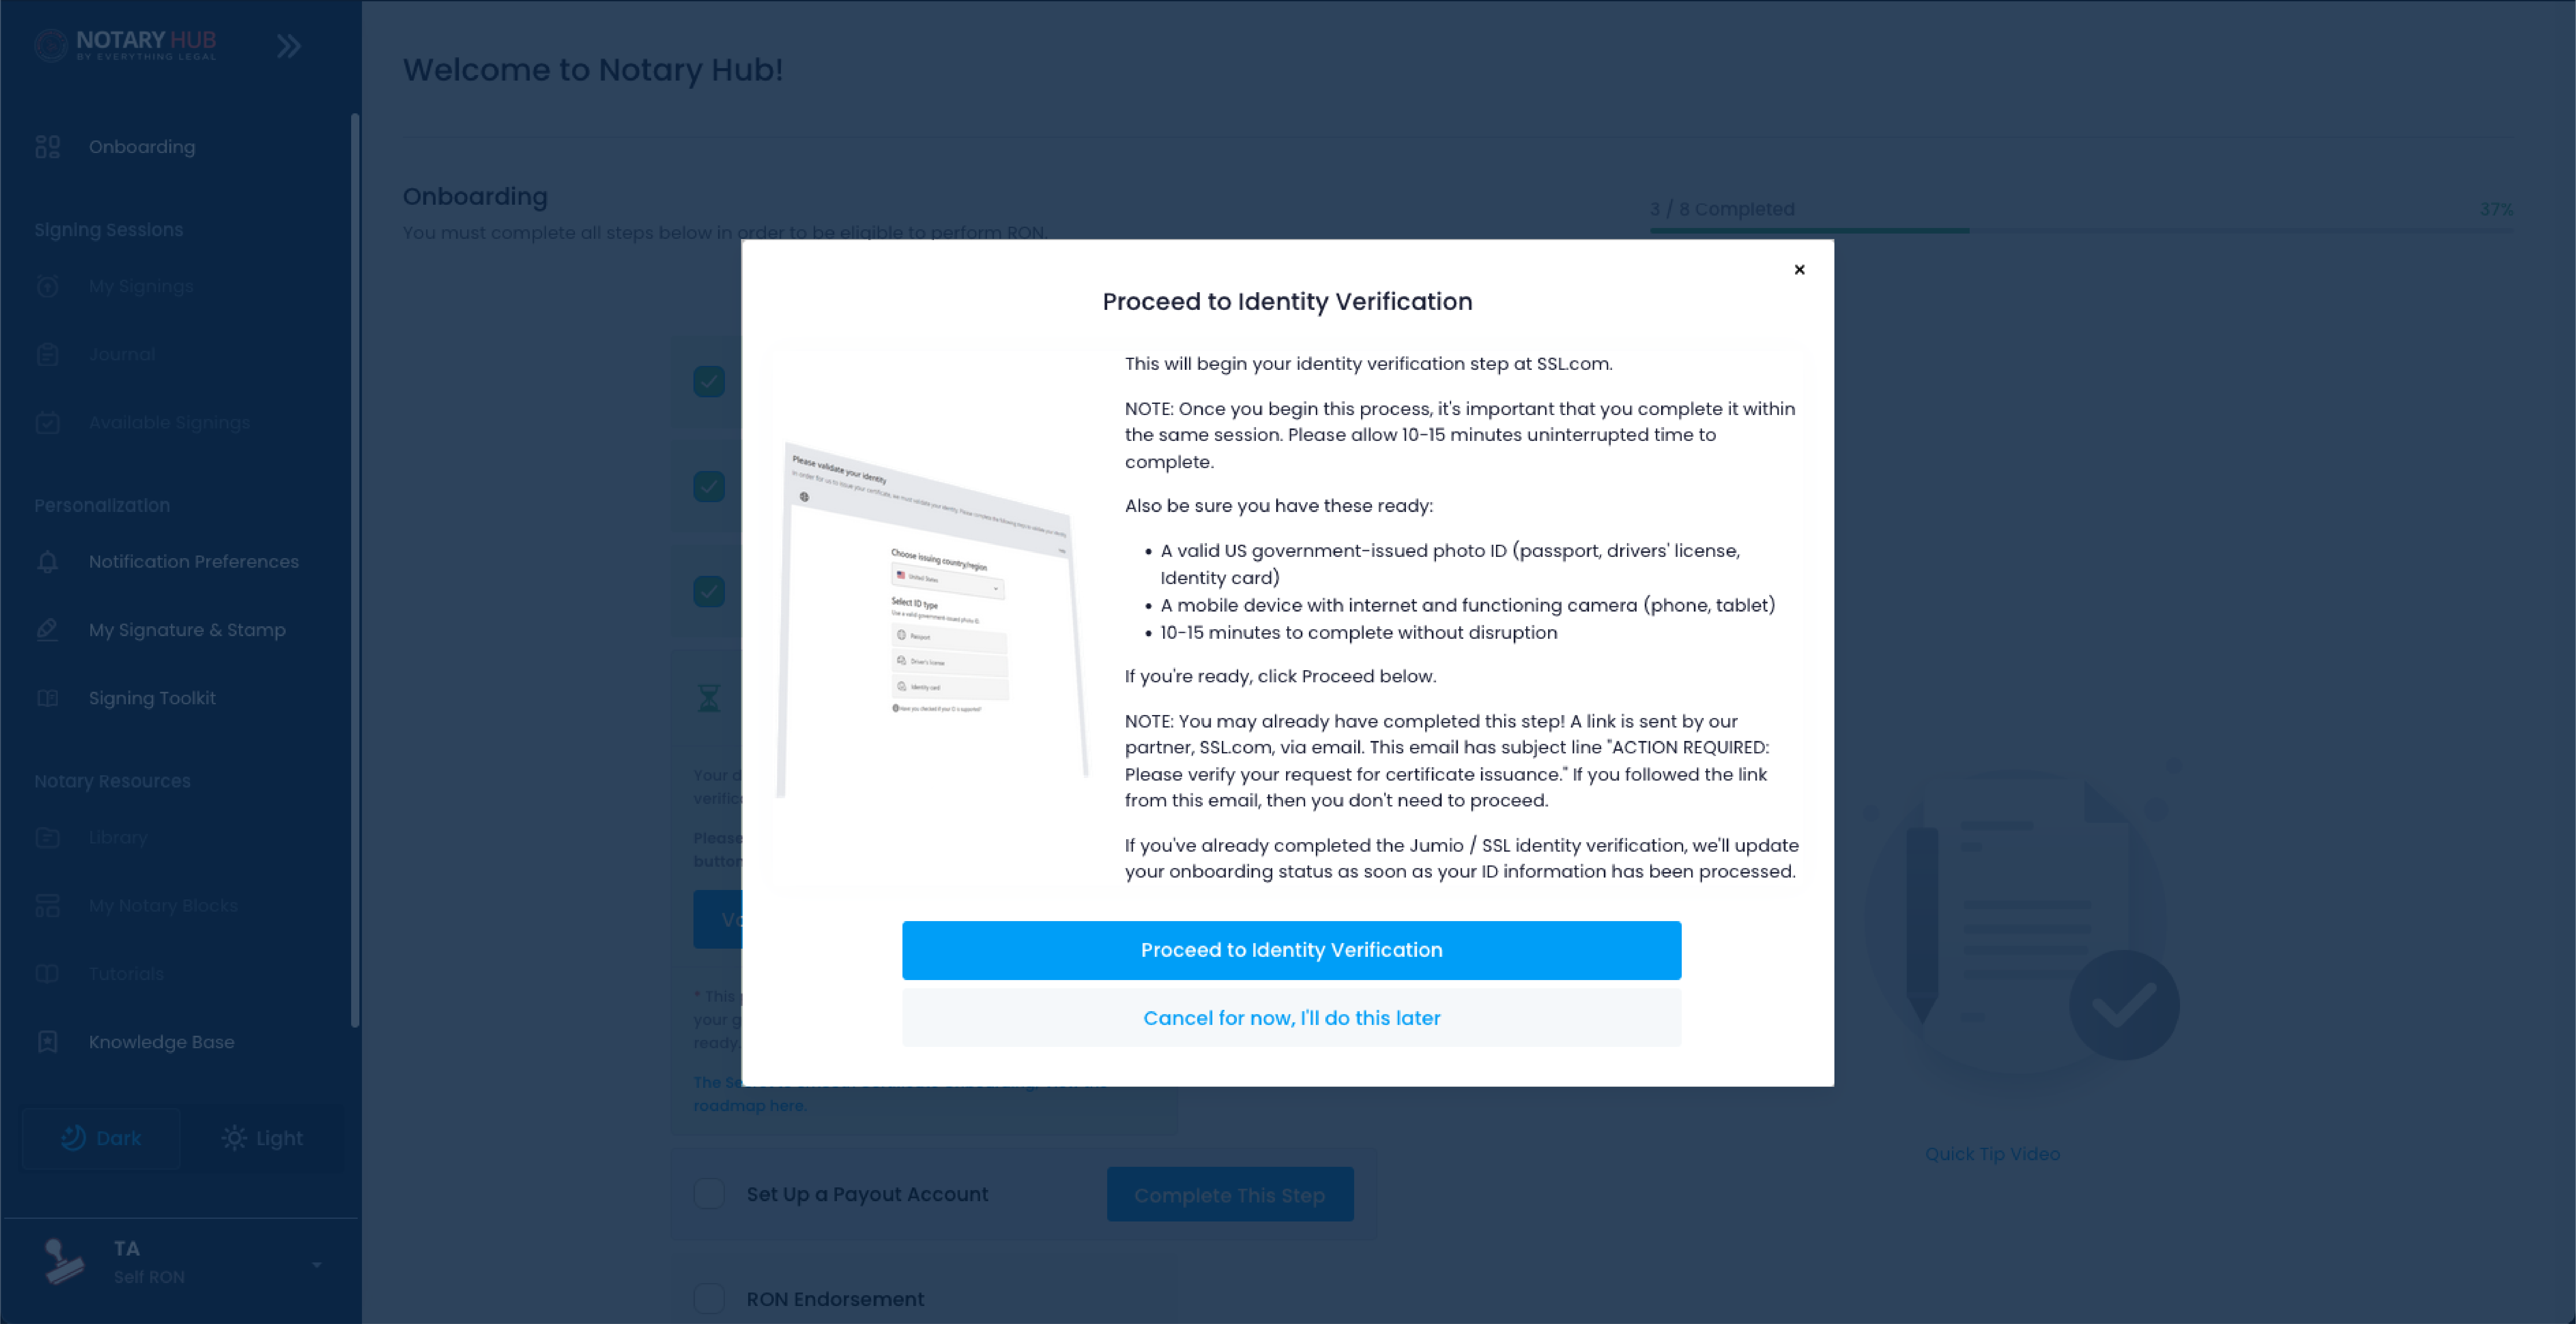 |
Identity Verification Process
| Instructions | Visuals |
|---|---|
| A pop-up browser will appear from SSL.com asking for the credentials that you just created for SSL.com. Enter them here and click the green "Member Login" button. | 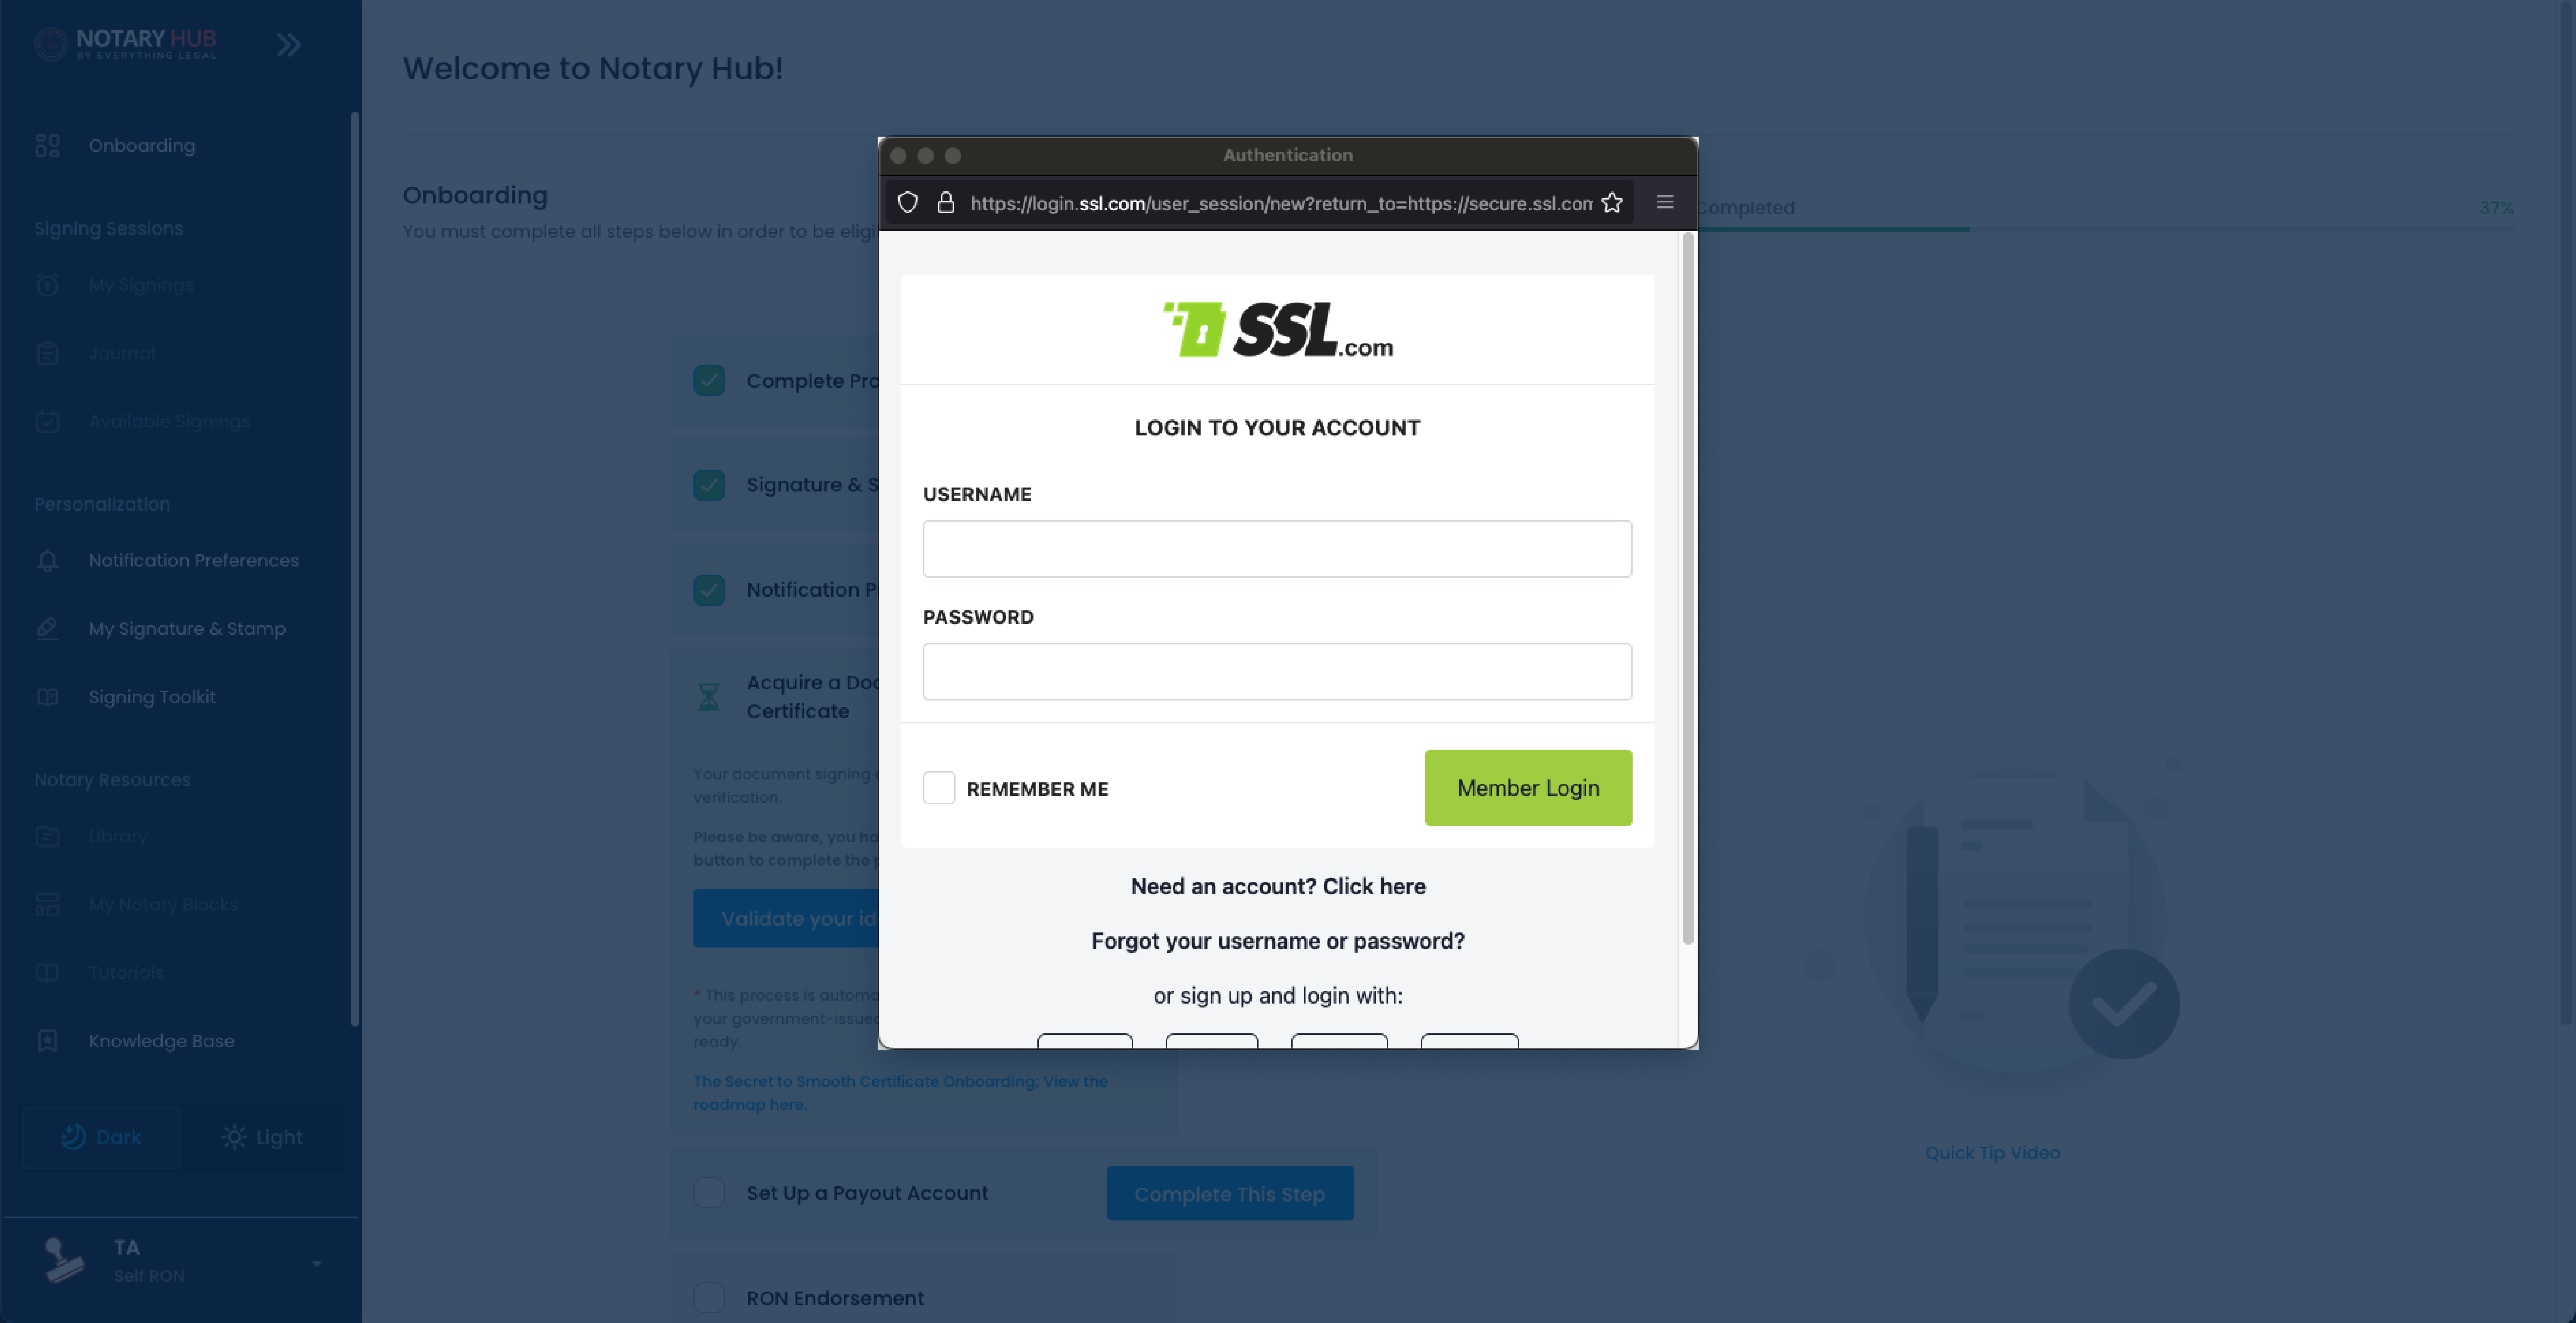 |
| The pop-up browser will update with instructions to "Please validate your identity" and a warning not to use incognito or private browsing mode. | 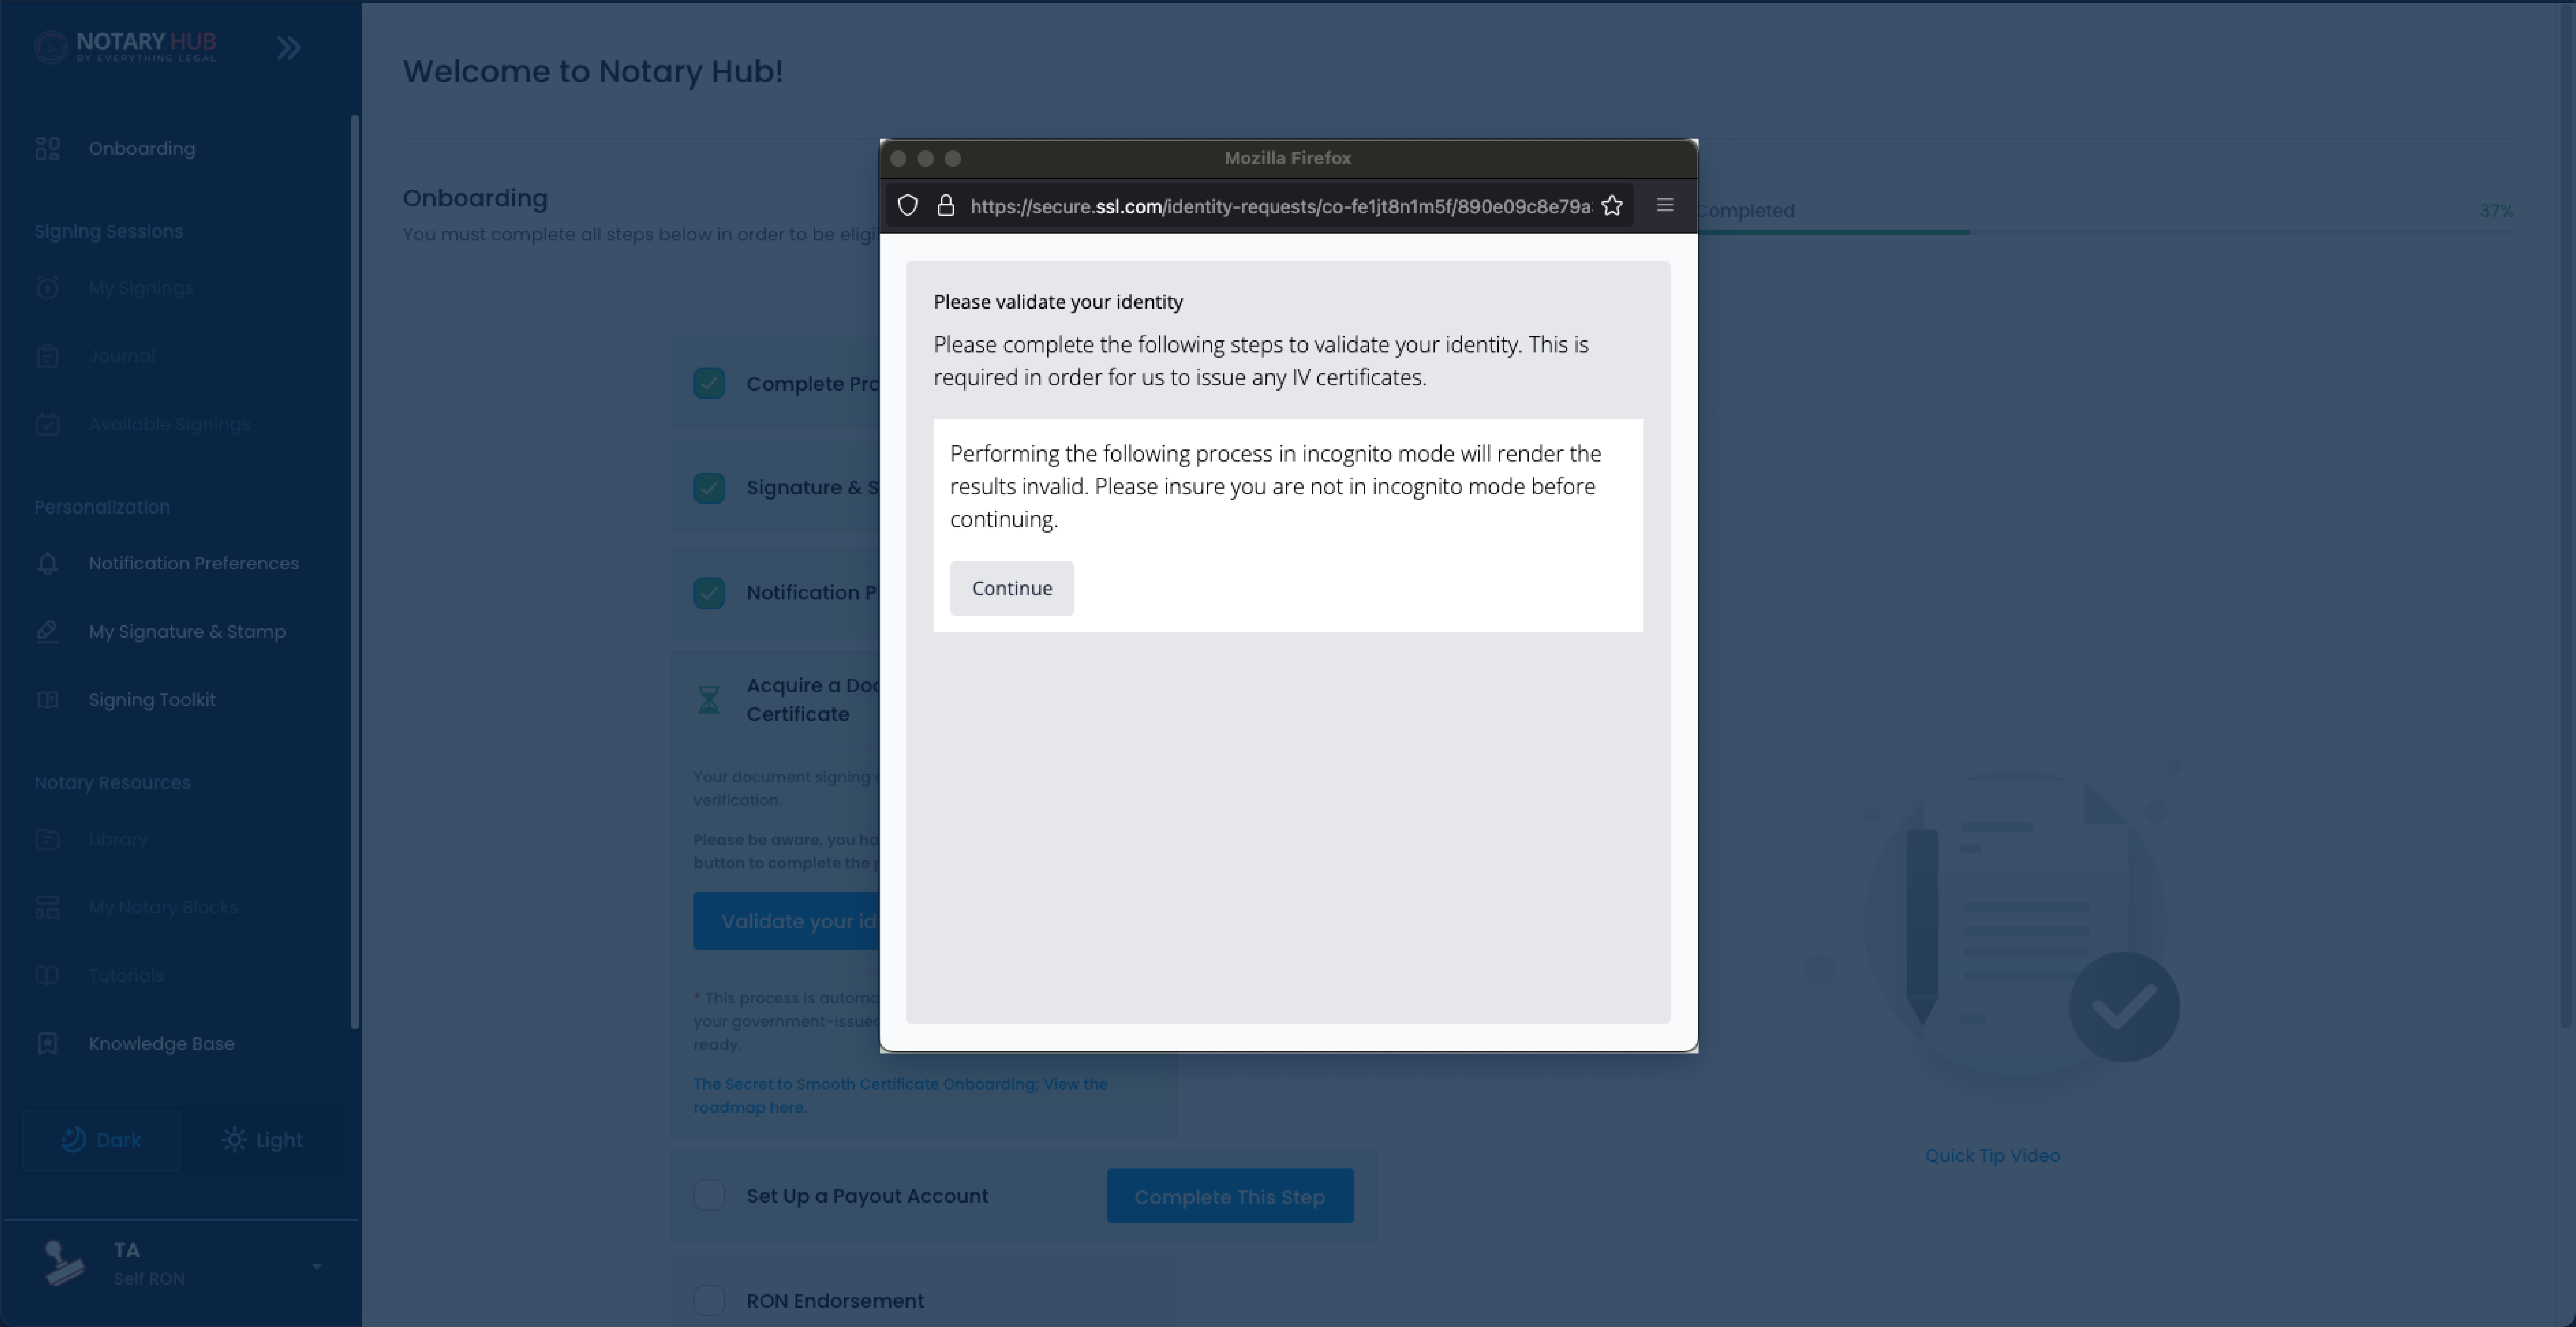 |
| On the next screen, you have options to scan a QR code or enter your mobile phone number. Choose one of these options and then you will follow the instructions sent to your mobile device. | 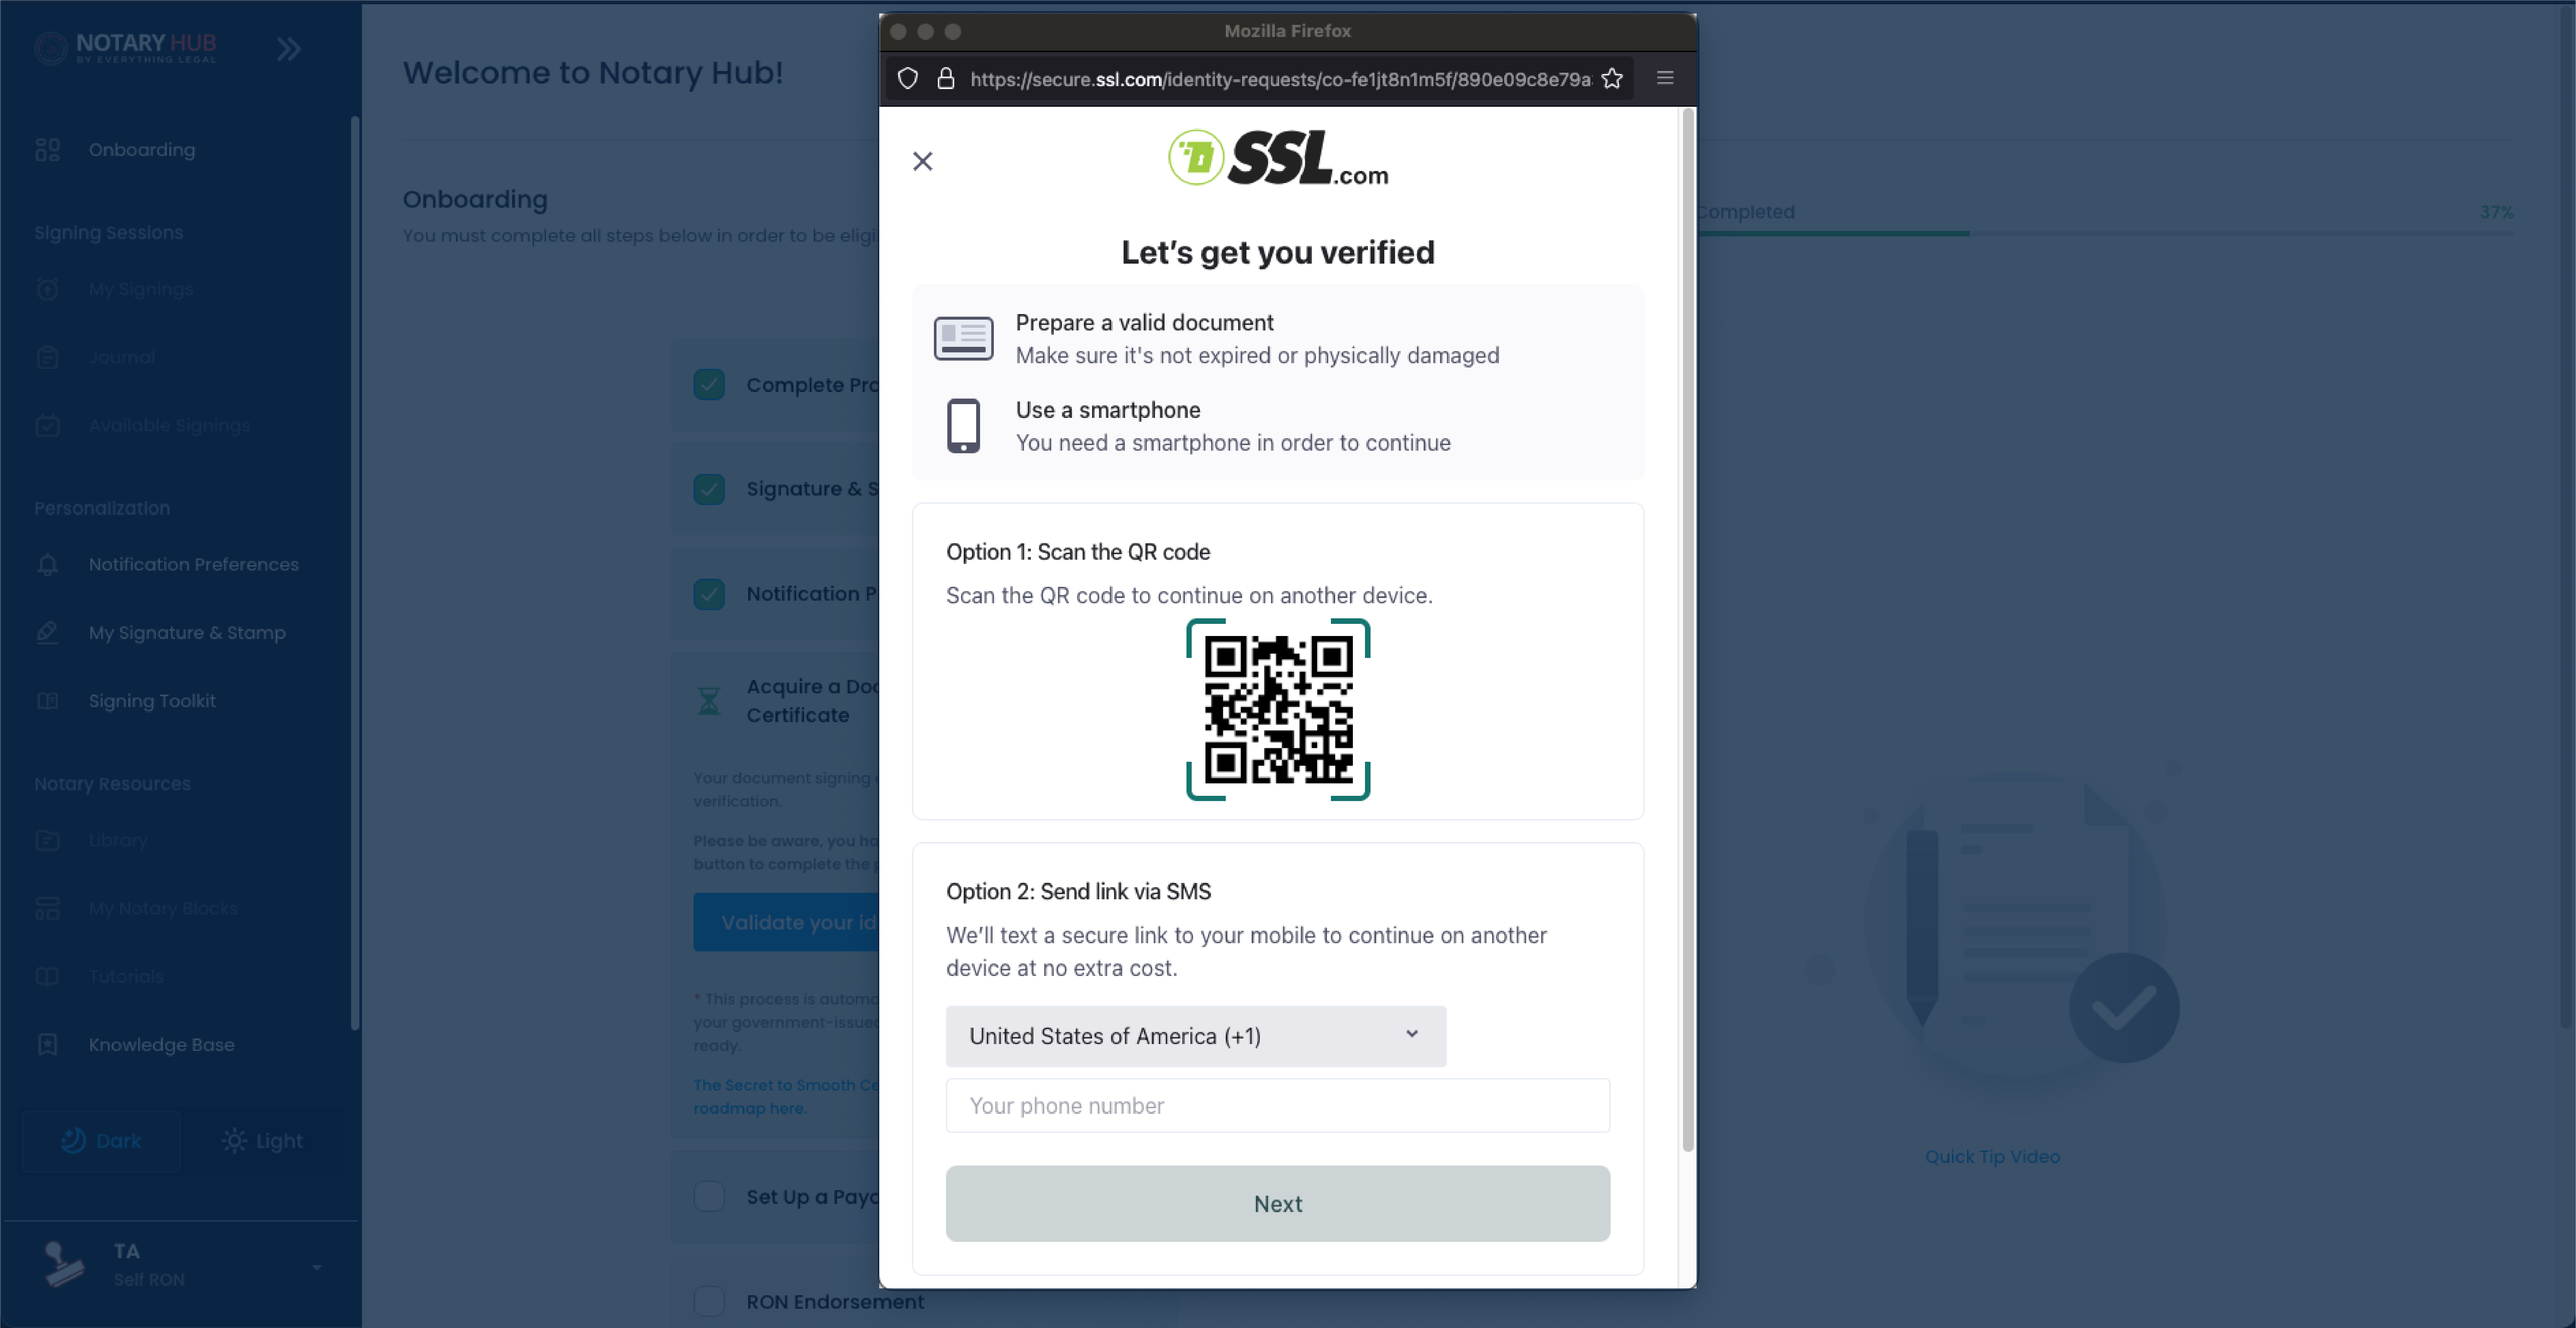 |
Identity Verification on Mobile Device
IMPORTANT: Allocate at least 10-15 minutes to complete this process without interruption
| Instructions | Visuals |
|---|---|
| After scanning the QR code, or clicking the link sent to your mobile device, you will be directed to SSL.com's "Confirm your identity" page. Click the "Let's go!" button. | 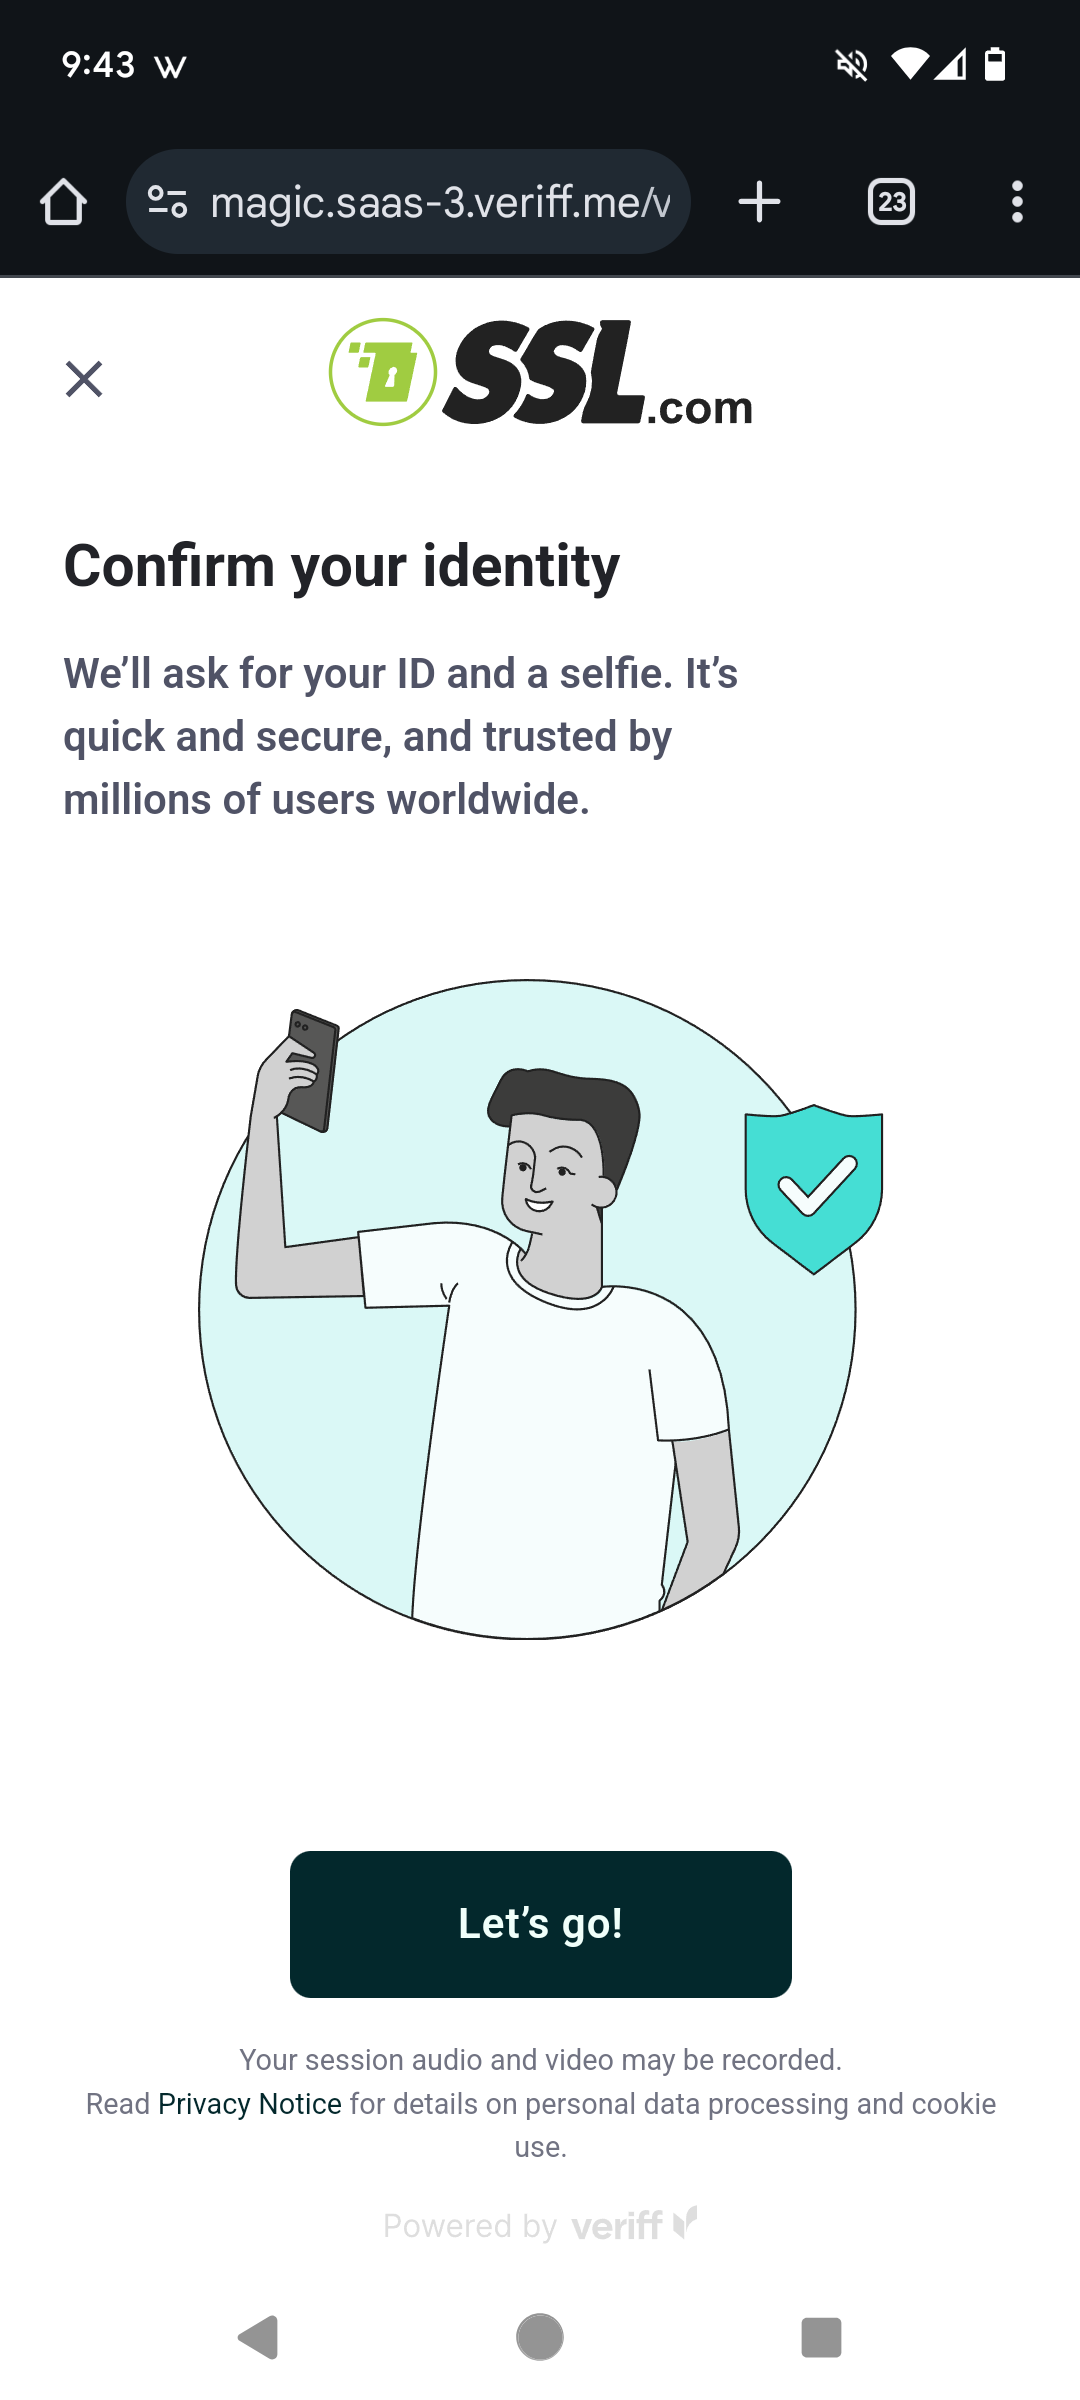 |
| Make sure to enable camera access so you can take a picture of your government issued ID and a picture of yourself. | 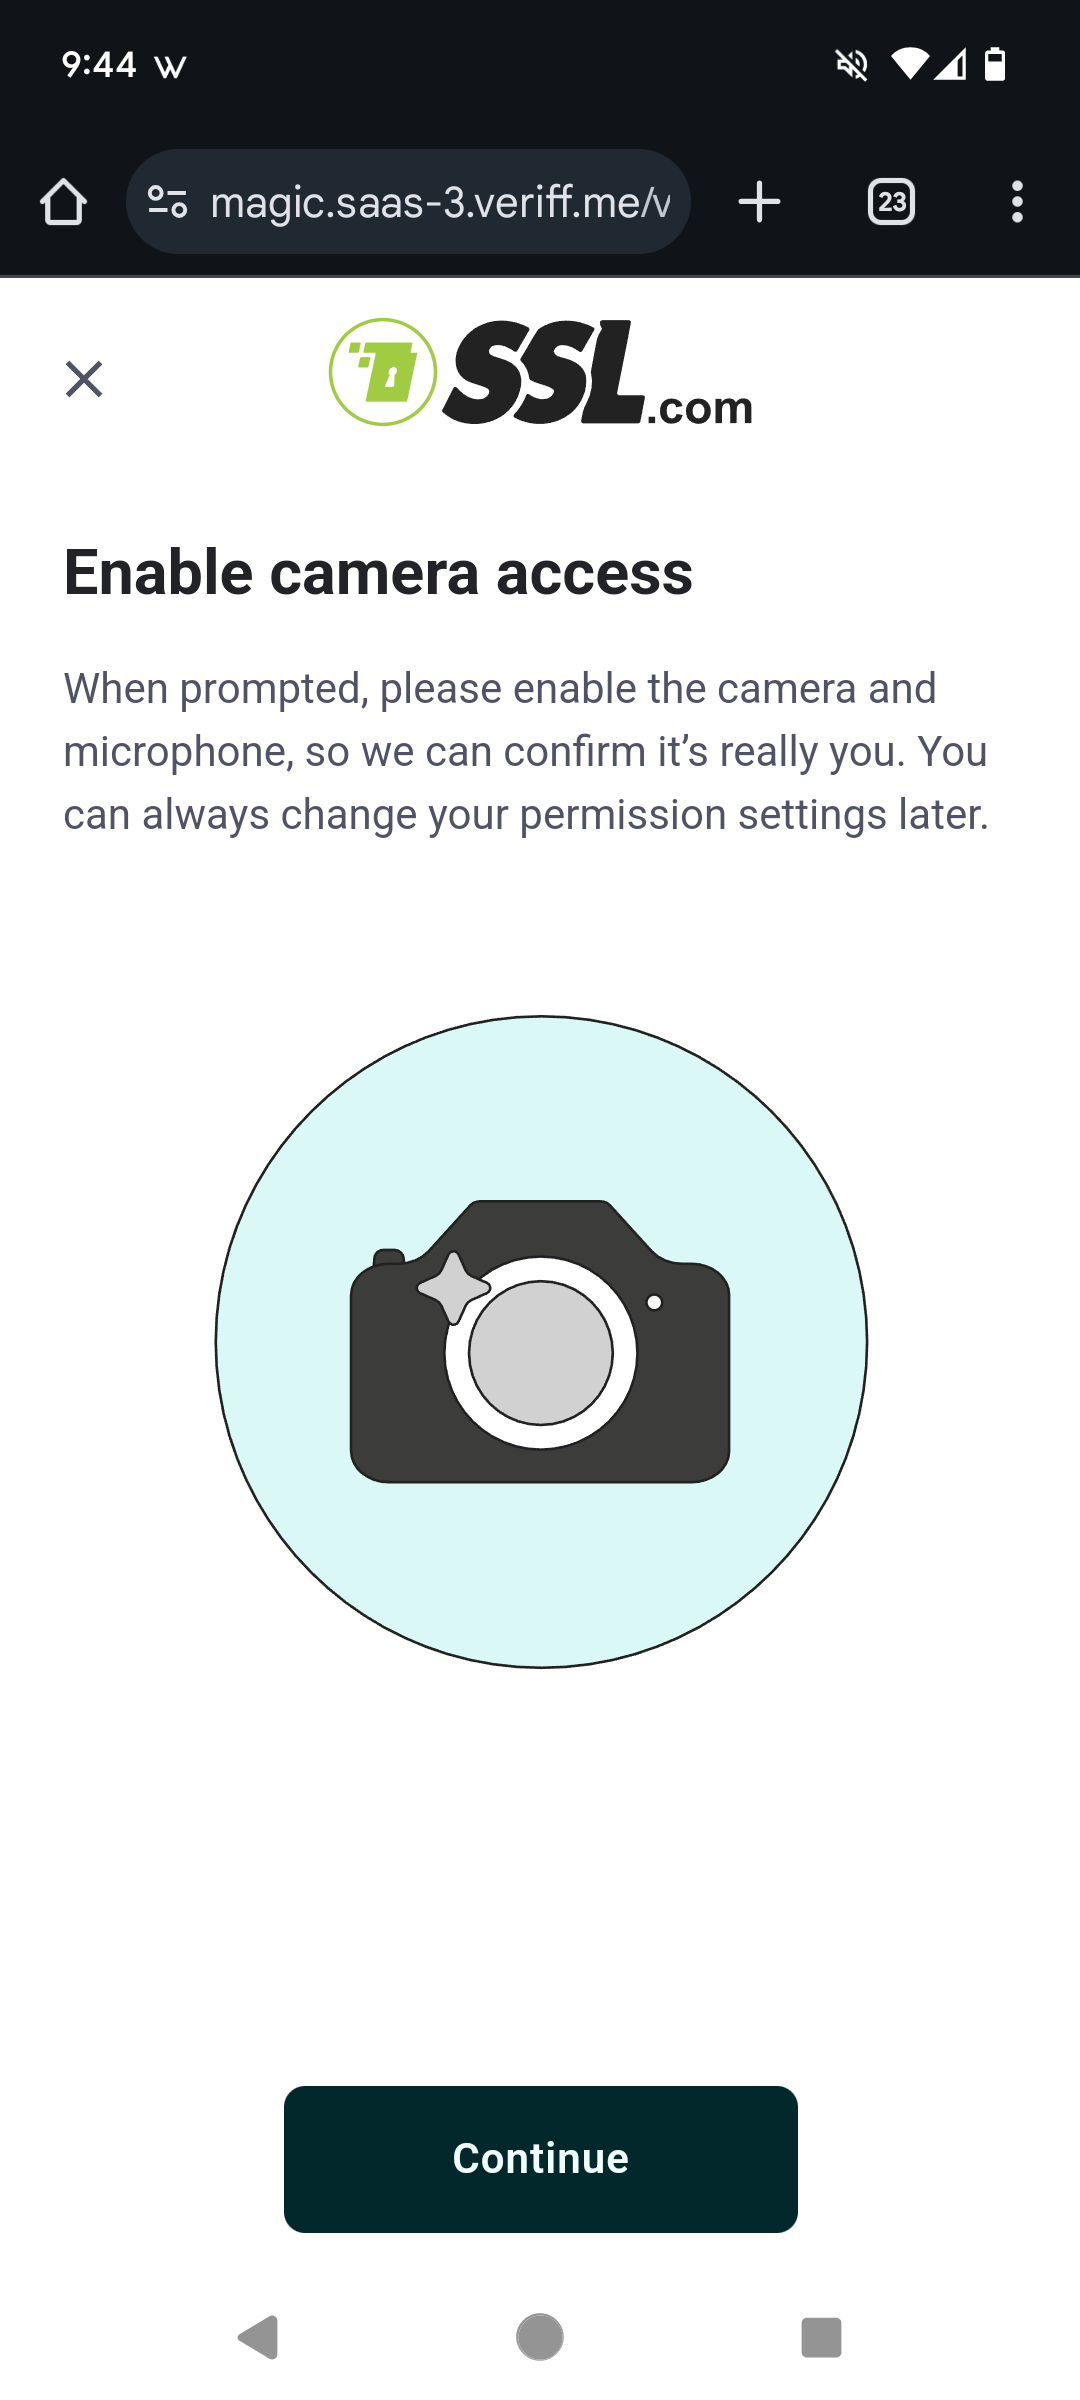 |
| Follow the instructions to capture photos of your government-issued ID. |  |
| Take a selfie as directed. |  |
| After completing all the steps you will see a “Thank you!" message and can direct your attention back to your computer. |  |
| Your computer will also update with the same “Thank you!" message. Click the “Continue” button. |  |
| You will see a confirmation message "Identity Verification is Complete." | 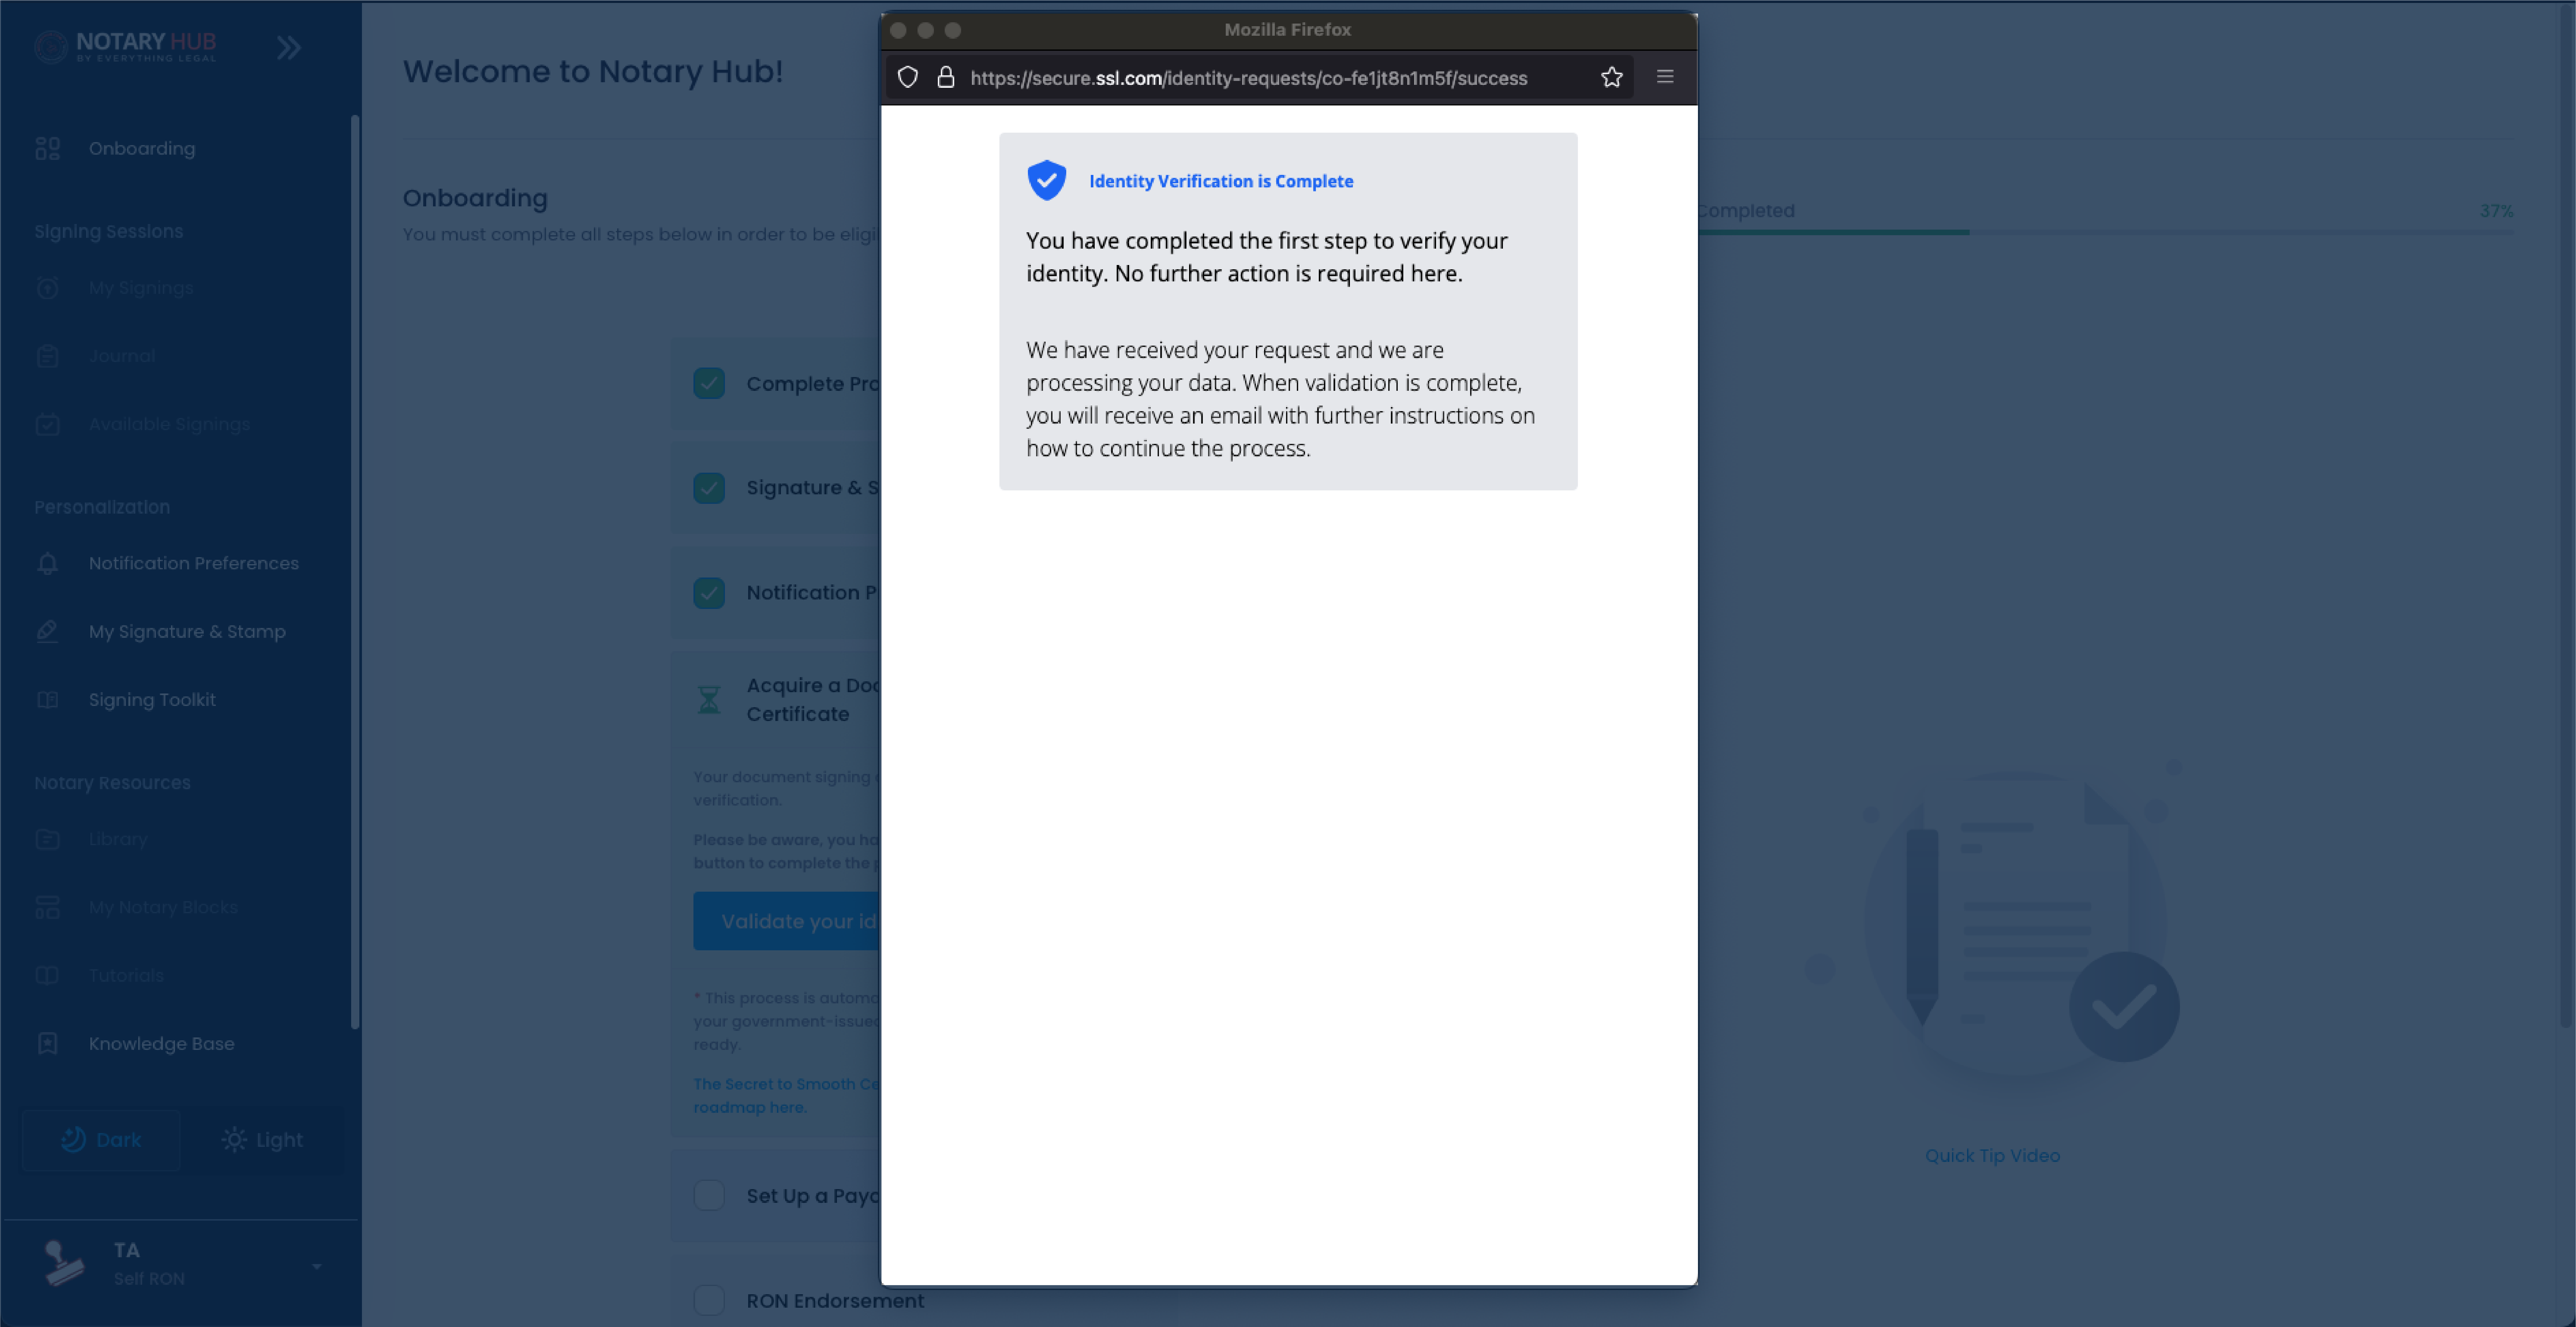 |
After completing verification, your certificate request will be reviewed by the SSL team. This is a manual process that typically takes 1-5 business days.
Complete Certificate Enrollment
After your certificate is issued:
| Instructions | Visuals |
|---|---|
| When your identity has been validated and certification approved, you will receive an email from Notary Hub with the subject "Your SSL X.509 document signing certificate has been validated and issued." letting you know that your signing certificate has been validated and issued. Click the link to navigate back to the Notary Hub website. You might have to log in again if your browser did not save your credentials. | 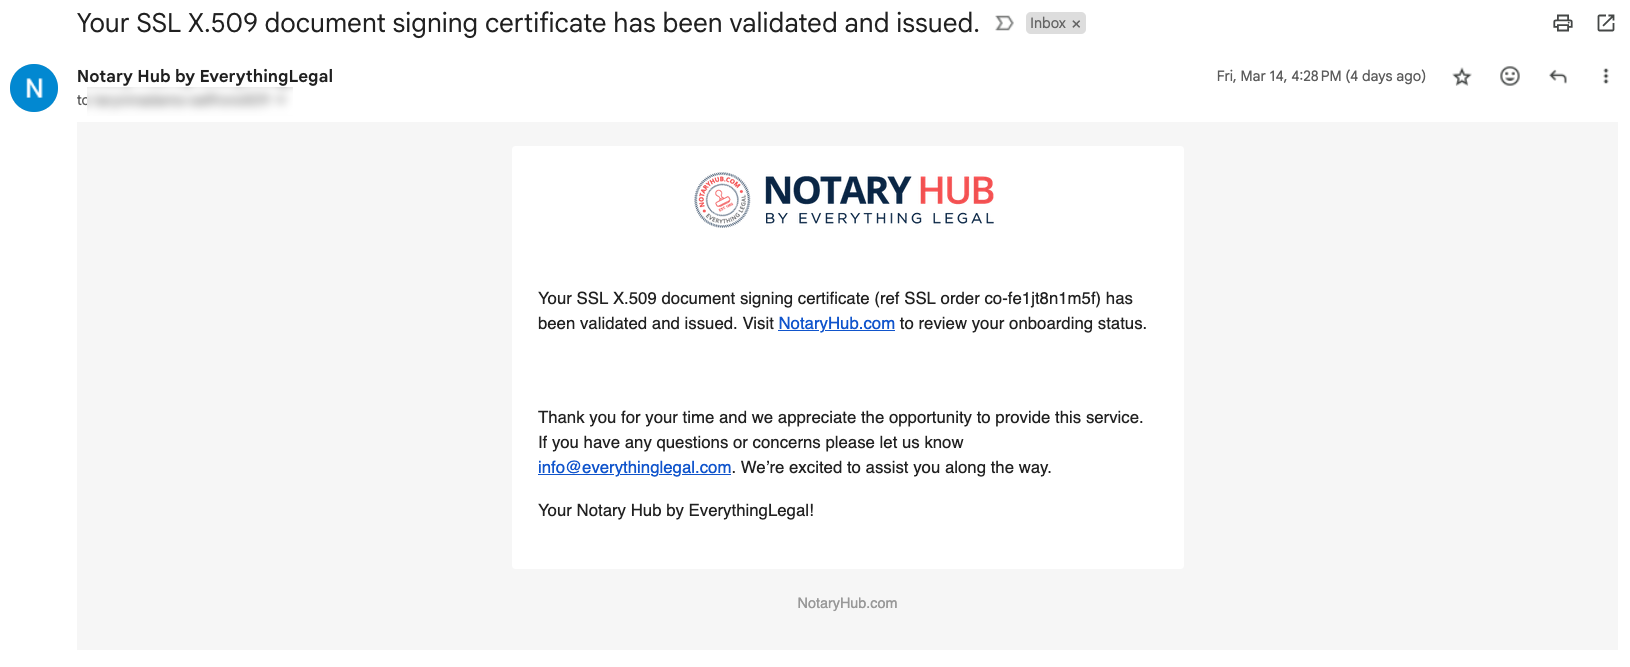 |
| Navigate back to Notary Hub's Signature and Stamp page and click the green "Activate Certificiate" button under "Signing X.509 Certificate." | 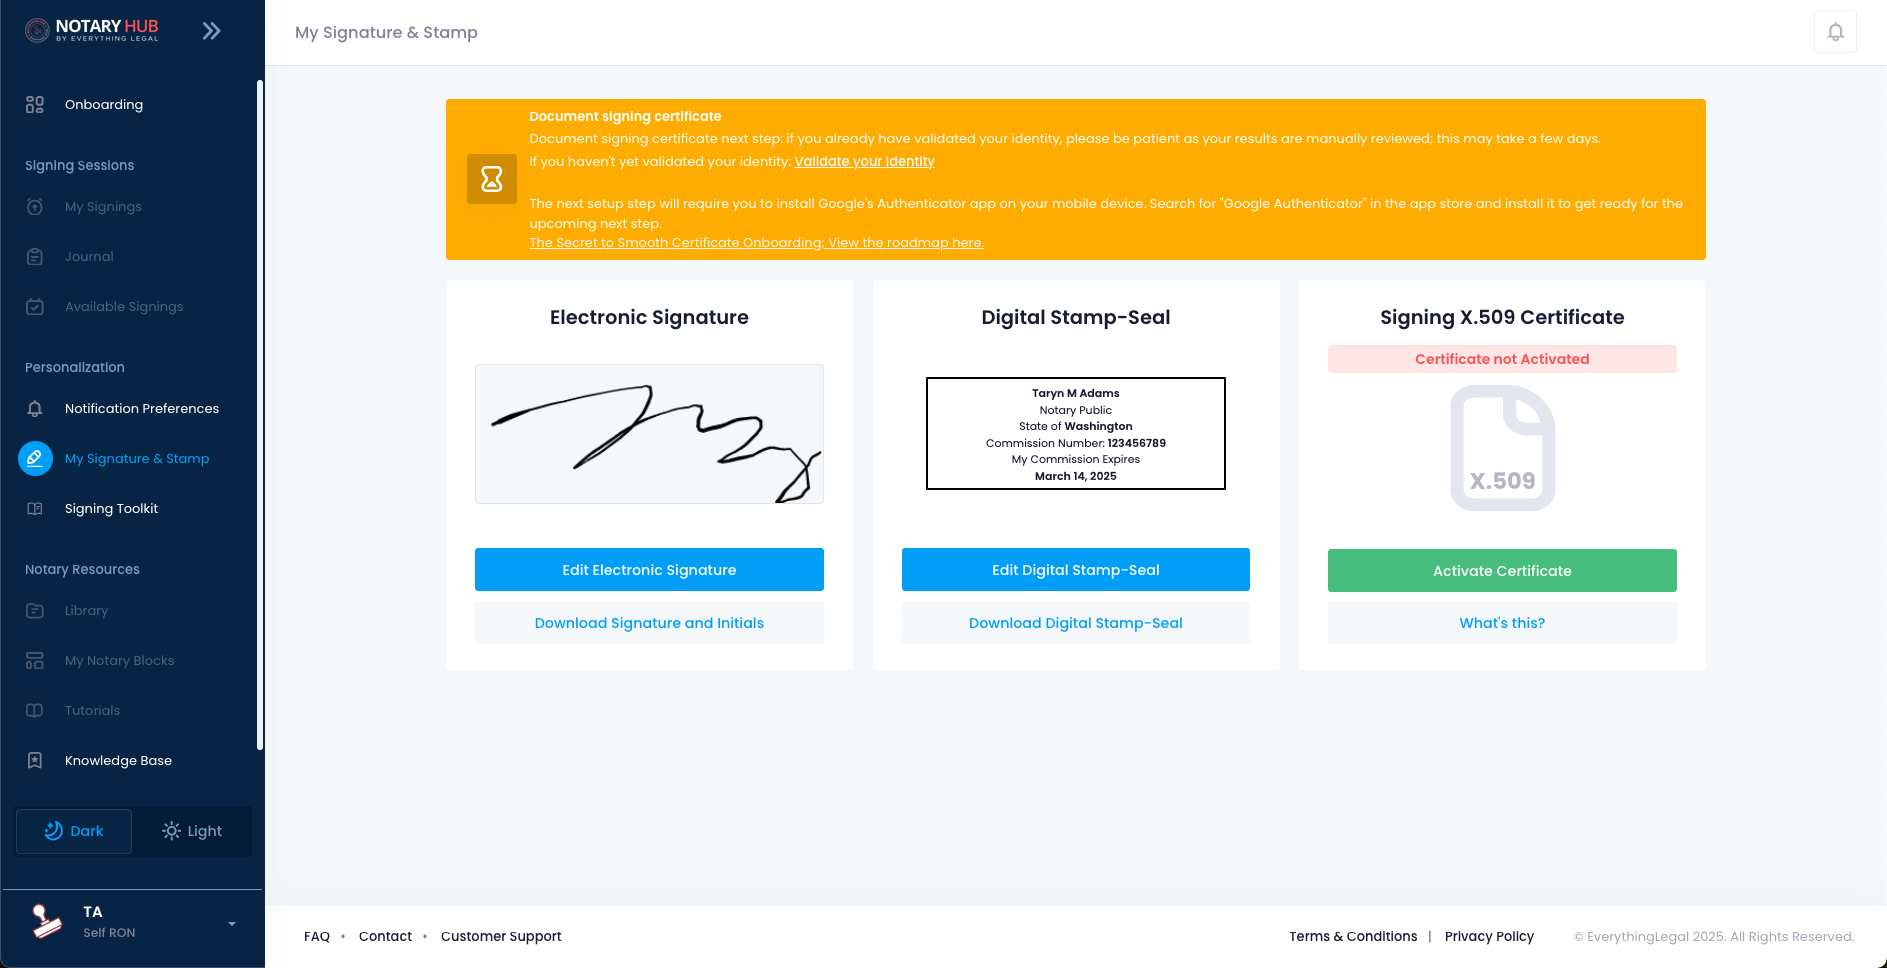 |
| You will get a pop-up asking to approve your information. After you have confirmed the identification fields are correct, click the blue "Approve" button. | 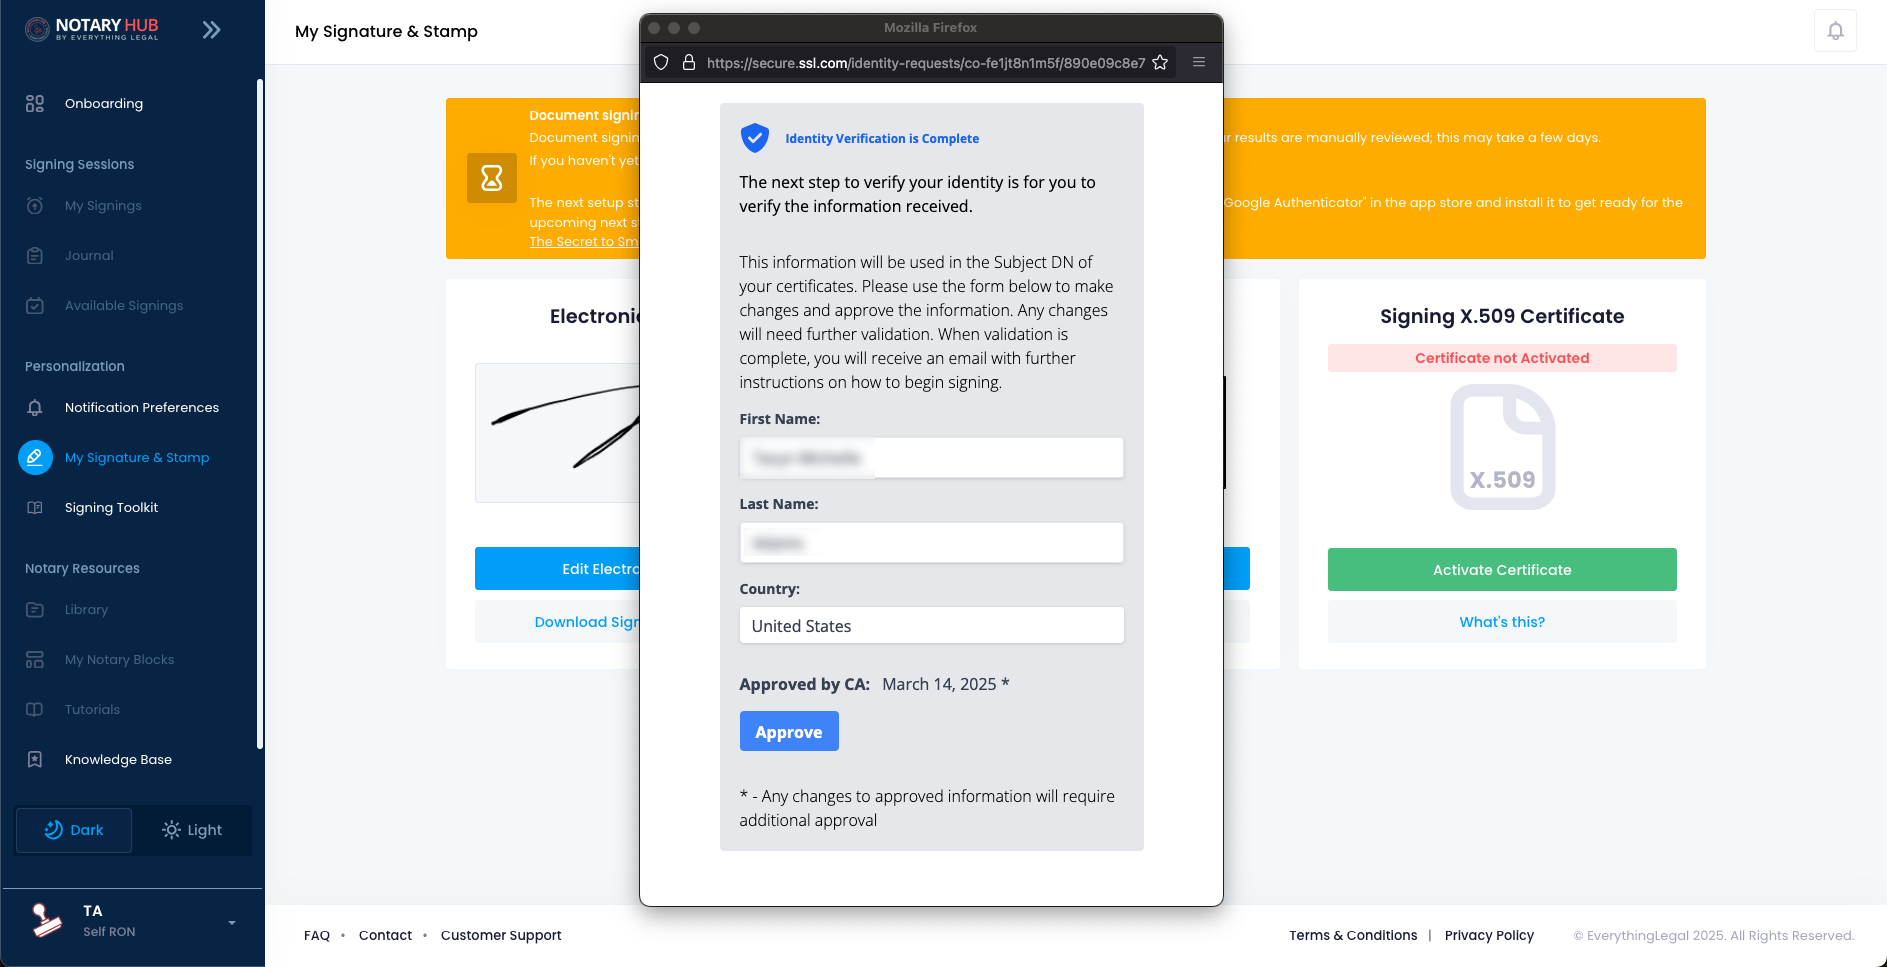 |
| Next you will be asked to create a private PIN number for security (must be four different, non-repeating numbers). Enter your PIN here and click the orange "Create PIN and Issue Certificate" button. | 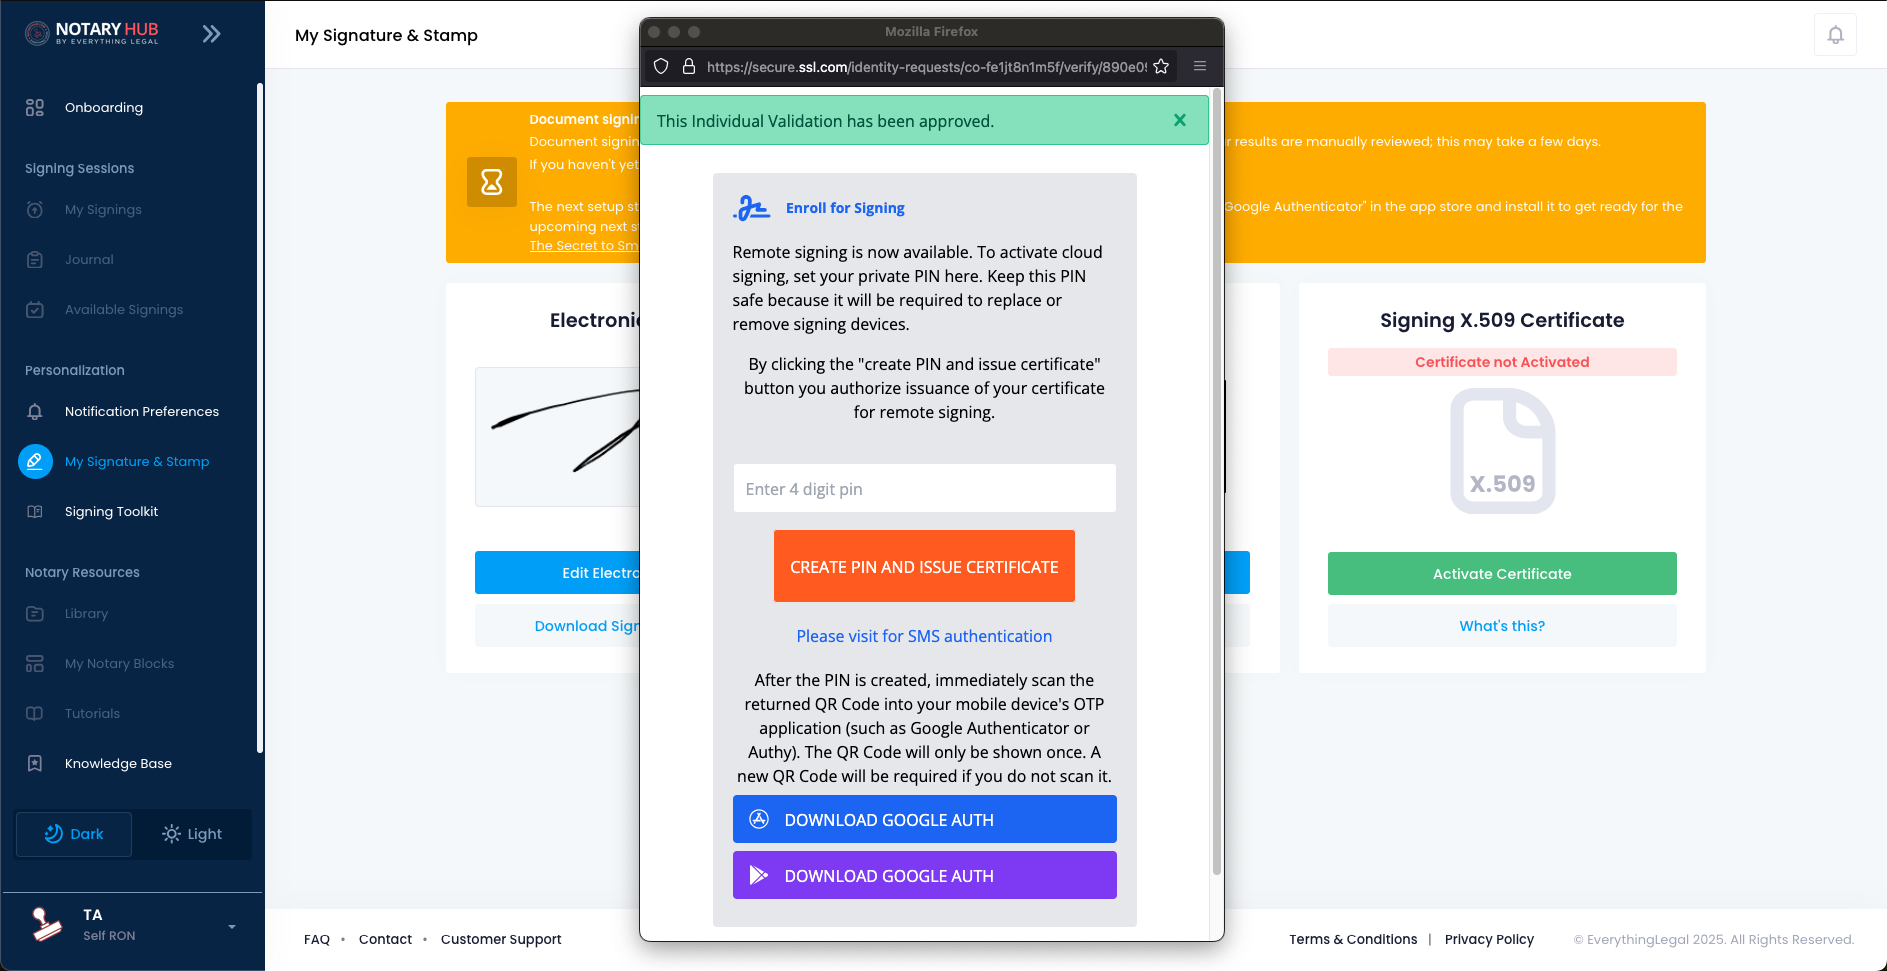 |
| You will then be presented with a QR Code. Open your authenticator app, tap the + icon, and select "Scan QR Code". IMPORTANT: Use the authenticator app to scan, NOT your phone's camera. After scanning, you'll see an "eSigner" entry in your authenticator app with a 6-digit code that changes every 30 seconds. | 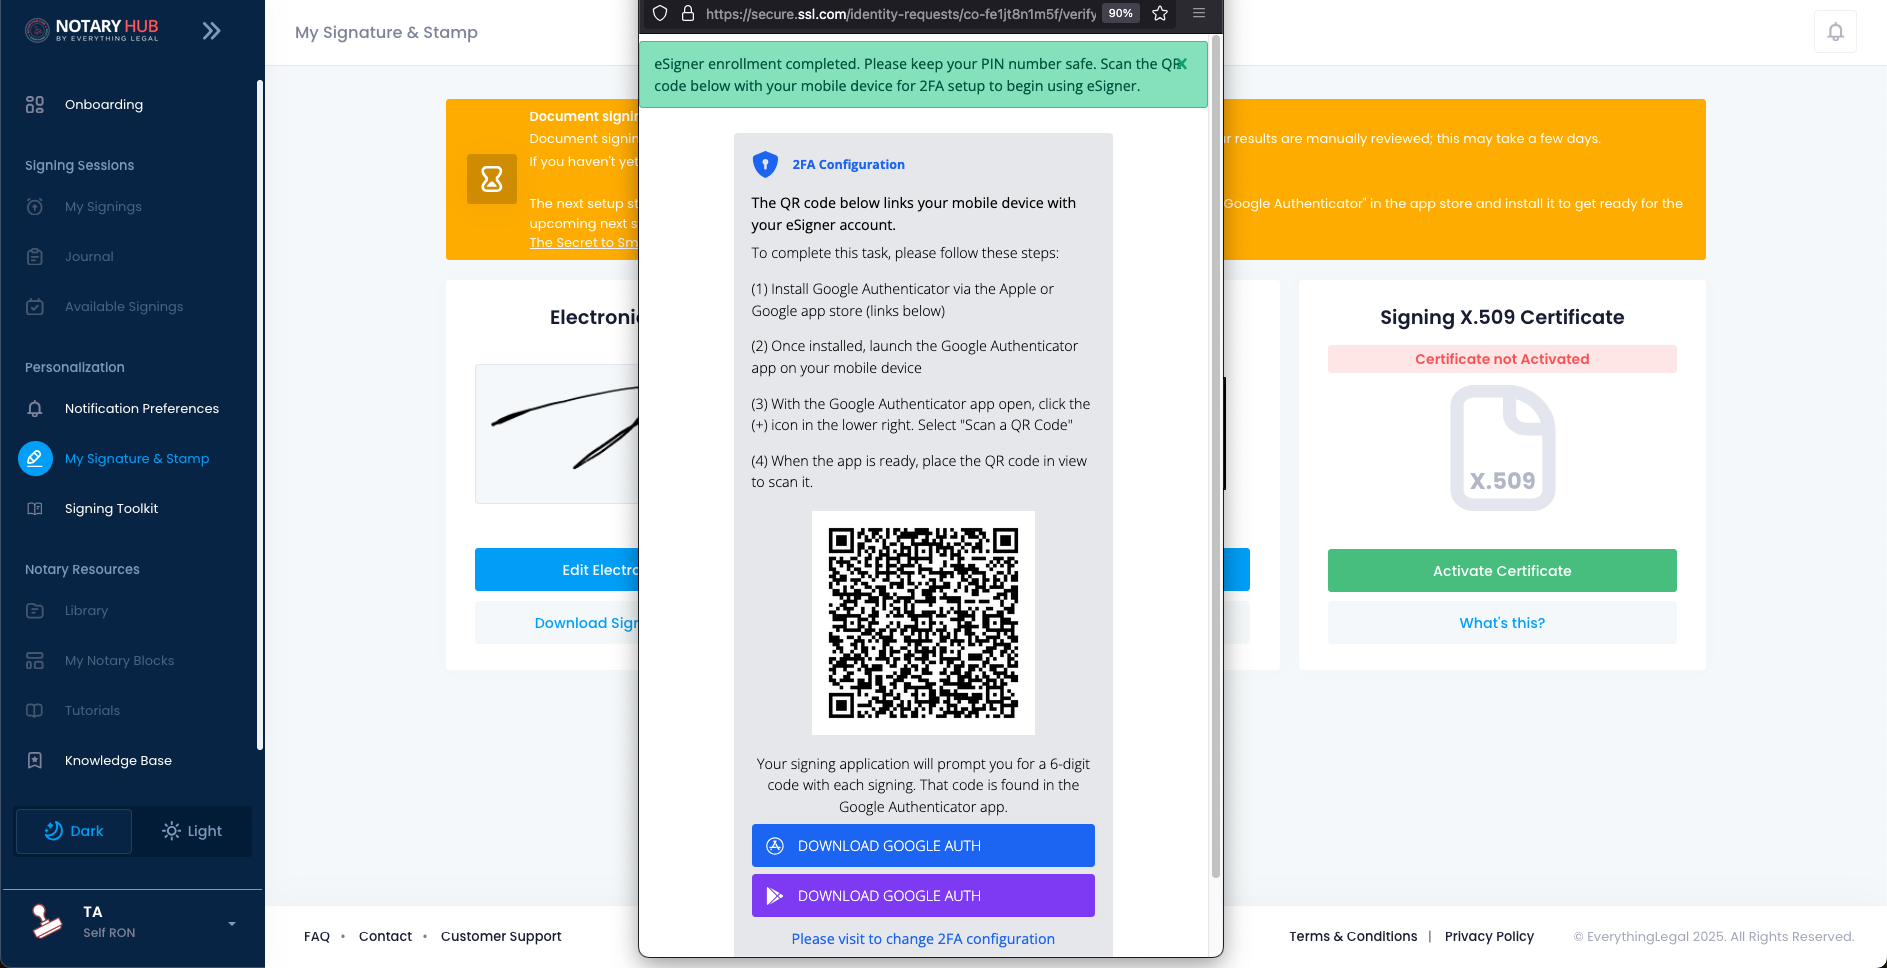 |
Setting Up Your Authenticator App
For detailed instructions, see [Set Up Authenticator](Set Up Authenticator_01.md).
- Download Google Authenticator (Android) or Google Authenticator (iOS).
- Open the app and scan the QR code provided by SSL.com.
- Store the generated 6-digit code securely.
Using Your Certificate with Notary Hub
Applying Your Digital Signature
During a notarization session:
- When you reach the signature step, Notary Hub will automatically detect your certificate
- You'll be prompted to enter your 4-digit PIN
- Next, you'll need to enter the current 6-digit code from your authenticator app
- Note: This code changes every 30 seconds, so enter it promptly or wait for the next code
- After successful verification, your digital signature and notary seal will be applied to the document
Verifying Successful Application
After signing:
- The document will be cryptographically sealed
- A certificate of completion will show that your digital signature was successfully applied
- The document is now tamper-evident and legally compliant
Alternative Scenarios
Start the Certificate Setup Process from Onboarding
| Instructions | Visuals |
|---|---|
| Log in to your Notary Hub account. | |
| Navigate to the "Onboarding" tab if you are not already there. Complete your profile by clicking on the blue "Complete This Step" button. | |
| After you have completed your profile, the next step of "Signature & Stamp" becomes available. You can click on "Complete this Step" next to Signature & Stamp. |  |
| Add your electronic signature and digital stamp-seal. | |
| Click the blue "Order a Certificate" button under "Signing x.509 Certificate." | |
| Alternatively, under the Onboarding instructions you can click the blue "Complete this Step" button next to "Acquiring a Document Signing Certificate." | |
Frequently Asked Questions
Q: How do I renew my certificate when it’s about to expire, and will I need to go through the ID verification again?
- A: To renew your certificate, follow the same purchase process through Notary Hub. Depending on the certificate provider’s policies, you may be required to re-verify your identity. It’s recommended to start the renewal process at least 30 days before expiration to avoid any disruptions.
Q: What happens if my certificate expires while I’m in the middle of a notary session?
- A: If your certificate expires, you will not be able to complete the notary session. To prevent this, ensure your certificate is renewed in advance. Notary Hub provides expiration reminders to help avoid interruptions.
Q: Can I use an existing Identrust certificate on Notary Hub, or do I have to purchase through SSL.com?
- A: Yes, you can use an existing Identrust certificate with Notary Hub. You will need to manually add it to your account by following the certificate integration steps in your Notary Hub settings.
Q: How do I track my certificate order progress in real time on my Notary Hub dashboard?
- A: Once you purchase a certificate through Notary Hub, you can track the order status from your Notary Hub dashboard. Updates on verification, approval, and activation will be displayed so you know when your certificate is ready for use.
Q: How quickly can Notary Hub support respond if I have an issue with my certificate during a signing?
- A: Notary Hub provides priority support for certificate-related issues during active signing sessions. If you experience a problem, contact support immediately through the Notary Hub help center for real-time assistance.
Q: How do I start the purchase process for my certificate through Notary Hub?
- A: Log in to your Notary Hub account, navigate to the "My Signature & Stamp page, and select "Order a Certificate." Follow the prompts to create an SSL.com account and complete your purchase.
Q: Why do I have to create a separate account with SSL.com when I already have a Notary Hub account?
- A: SSL.com manages digital certificate issuance independently. Creating a separate account ensures secure certificate management and compliance with industry regulations.
Q: What email address should I use to register my certificate, and can it be different from my Notary Hub email?
- A: It is recommended to use the same email as your Notary Hub account to avoid integration issues, but SSL.com allows different email addresses if necessary.
Q: What if I accidentally use a different email for SSL.com than the one I use for Notary Hub?
- A: If your SSL.com email does not match your Notary Hub account, you may experience integration issues. Contact Notary Hub support if you need assistance.
Q: Why do I need to create a different password for my SSL.com account?
- A: SSL.com is a separate platform that requires its own secure login credentials to manage your certificate and authentication process.
Q: How much does the certificate cost, and are there discounts for multi-year purchases?
- A: Pricing varies based on the certificate duration. Multi-year certificates often include cost savings. Check the Notary Hub dashboard for current pricing and promotions.
Q: Will my credit card be charged immediately when I purchase through Notary Hub?
- A: Yes, payment is processed immediately upon purchas
Q: Why is an ID verification process required for obtaining a digital certificate?
- A: ID verification ensures that only authorized notaries receive digital certificates, preventing fraud and maintaining compliance.
Q: Which government-issued IDs are acceptable for the validation process?
- A: A valid driver's license, passport, or other government-issued ID with a photo and signature.
Q: How do I verify my phone number, and why is this necessary?
- A: You will receive a verification link or code via SMS to confirm your identity. This is required for security purposes.
Q: What if I start the ID verification process and can’t complete it right away? Do I lose my progress?
- A: If you don’t complete verification in one session, you may need to restart the process from the beginning.
Q: What happens if my ID verification fails or times out?
- A: You may retry verification or contact Notary Hub support for assistance.
Q: I was already verified once for RON. Why do I need to do this again with SSL.com?
- A: Each certificate authority requires independent verification to comply with security standards.
Q: Can I use a laptop webcam for the ID scan, or do I have to use a mobile device?
- A: A mobile device is recommended for a clearer image, but some webcams may be acceptable.
Q: How long does the entire ID verification process take, and how will I know if it’s done?
- A: The process typically takes 10–15 minutes. You will receive an email confirmation once completed.
Q: What is an X.509 document signing certificate, and why do I need one to perform remote online notarizations?
- A: An X.509 certificate is a digital credential that verifies your identity as a notary. It creates tamper-evident seals on documents notarized online, ensuring their authenticity and legal compliance. Most states that allow remote online notarization require notaries to use digital certificates.
Q: Does every state require a digital certificate to perform RON signings?
- A: Most states that authorize RON require digital certificates, but specific requirements vary. Check your state's notary laws or consult Notary Hub’s state-specific guidance.
Q: How does having a cloud-based certificate differ from using a physical USB token?
- A: A cloud-based certificate is stored securely online and accessed through authentication apps, eliminating the need for physical hardware. This allows you to perform notarizations from multiple devices while maintaining security. Physical tokens require you to carry and insert a USB device for each signing.
Q: What’s the difference between an SSL.com certificate and an Identrust certificate, and which one should I choose?
- A: Both are valid digital certificates for notarization. SSL.com certificates integrate seamlessly with Notary Hub and use cloud-based technology. IdenTrust certificates may be issued as physical tokens or cloud-based solutions. Notary Hub supports both, but the onboarding process differs slightly.
Q: How long is my certificate valid, and when do I need to renew it?
- A: Certificates are available with 1-year or 4-year validity periods. You should begin the renewal process at least 30 days before expiration to ensure continuity of service.
Q: How do I qualify for the new user discount on my certificate purchase?
- A: Discounts may be available for first-time users purchasing a certificate through Notary Hub. Check the Notary Hub dashboard or promotional emails for details.
Q: What if I never received the verification email?
- A: Check your spam folder and ensure SSL.com emails are not being blocked. Contact support if needed.
Q: Why is an ID verification process required?
- A: ID verification ensures only authorized notaries receive digital certificates, preventing fraud.
Q: What happens if my authentication fails?
- A: You may need to restart the verification process or contact support for assistance.
Q: What if I never received the verification email?
- A: Check your spam folder and ensure SSL.com emails are not being blocked. Contact support if needed.
Q: Why is an ID verification process required?
- A: ID verification ensures only authorized notaries receive digital certificates, preventing fraud.
Common Error Messages / Issues
Error: "Authenticator Code Not Working"
Solution: Ensure your device’s time settings are correct and try again.
Additional Resources
- [Managing a Multi Person Session as a Notary](Multi Person Session_Notary_02.md)